Zombienet guide
Intro
Zombienet was designed to be a flexible and easy to use tool, allowing users to describe complex network configurations that work across supported providers (e.g k8s, podman, native) and write tests in an intuitive way. The end goal is to create a smooth experience for parachain developers, giving them the confidence and simplicity to build and ship.
In this guide we will go through simple use cases as well as more complex ones, describing the trade-offs made and the current constraints for both network configurations and test specifications.
Example 0 - Different configuration file types (2 validators)
In this example, is shown the alternative options of a configuration file. The different extensions supported are: yaml, json and of course .toml.
This simple config exists only in order to show how the same configuration exists in 3 different formats, and thus uses only 1 relay chain (rococo-local) with 2 nodes (alice and bob);
The configuration files are:
- 0000-test-config-small-network.json;
- 0000-test-config-small-network.yaml;
- 0000-test-config-small-network.toml;
and the test files for running each configuration are:
- 0000-test-json-config-small-network.zndsl;
- 0000-test-yaml-config-small-network.zndsl;
- 0000-test-toml-config-small-network.zndsl;
respectively.
Each .zndsl file contains at the header part of the file the:
Network: ./0000-test-config-small-network.json
that describes which config file will be used for the test.
To run the three tests (assuming the native provider is used) just execute the following commands for each test:
./zombienet-linux -p native test examples/0000-test-json-config-small-network.zndsl
./zombienet-linux -p native test examples/0000-test-yaml-config-small-network.zndsl
./zombienet-linux -p native test examples/0000-test-toml-config-small-network.zndsl
Note: remember to use
-p podmanfor Podman as provider, while no-poption as default is thekubernetesone.
Example 1 - Small network (2 validators/ 1 parachain)
In this example small-network, we define a network (rococo-local) with two validators (alice/bob) and a parachain (paraId 100). Both of the validators are using the default image, command and args.
[relaychain]
default_image = "docker.io/parity/polkadot:latest"
default_command = "polkadot"
default_args = [ "-lparachain=debug" ]

chain = "rococo-local"

  [[relaychain.nodes]]
  name = "alice"
  validator = true

  [[relaychain.nodes]]
  name = "bob"
  validator = true

[[parachains]]
id = 100

  [parachains.collator]
  name = "collator01"
  image = "docker.io/parity/polkadot-parachain:latest"
  command = "polkadot-parachain"
  args = ["-lparachain=debug"]
Using kubernetes as provider we can simply spawn this network by running:
./zombienet-linux -p kubernetes spawn examples/0001-small-network.toml
or simpler, since kubernetes is the default provider as:
./zombienet-linux spawn examples/0001-small-network.toml
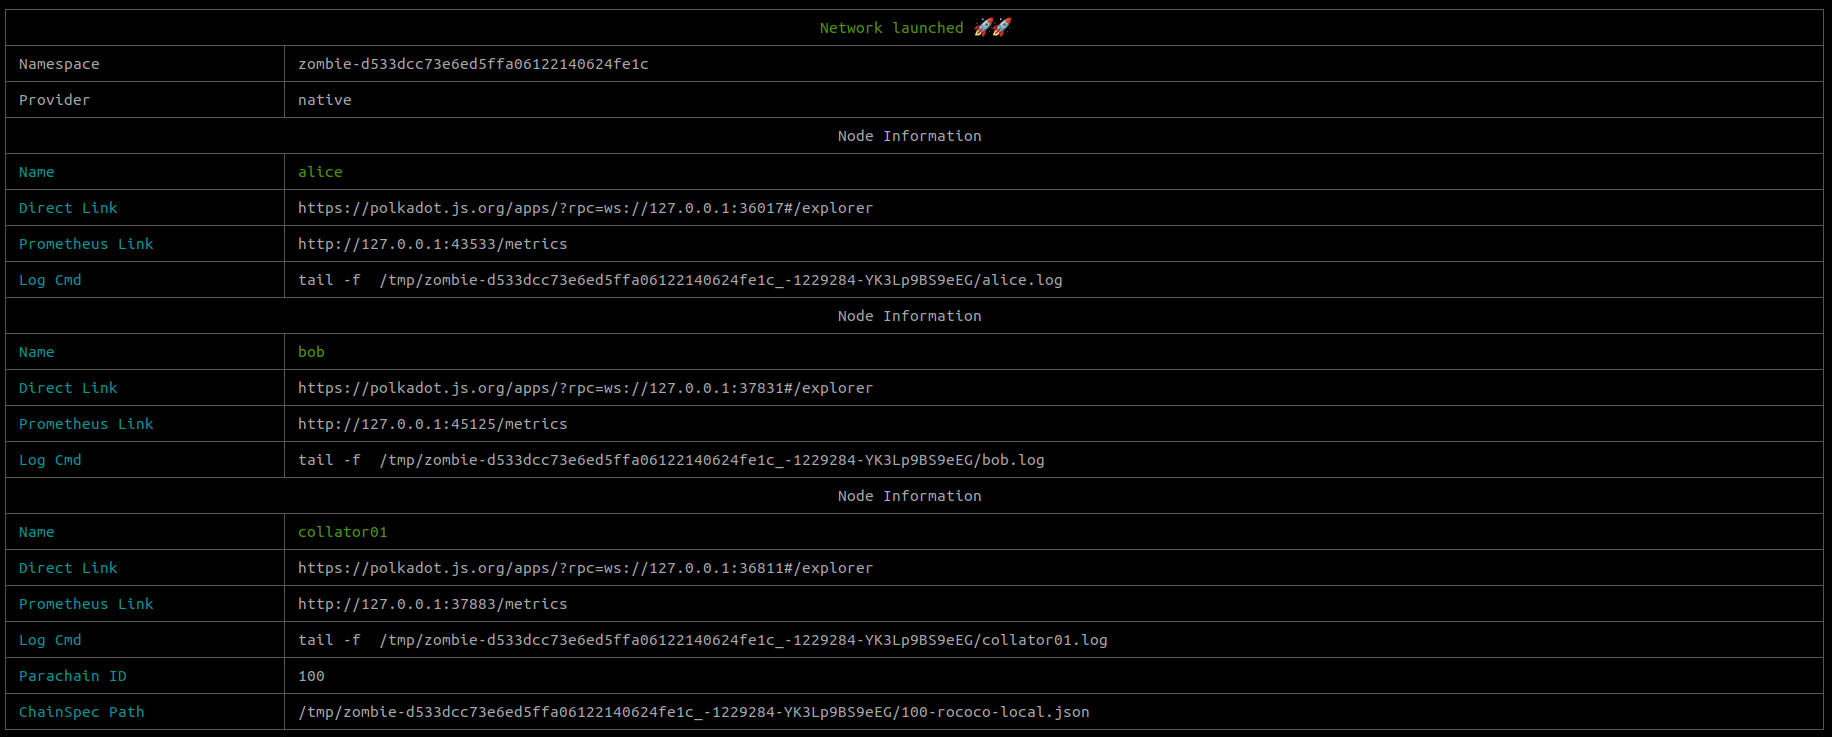
You will see how zombienet starts creating the needed resources to launch the network.
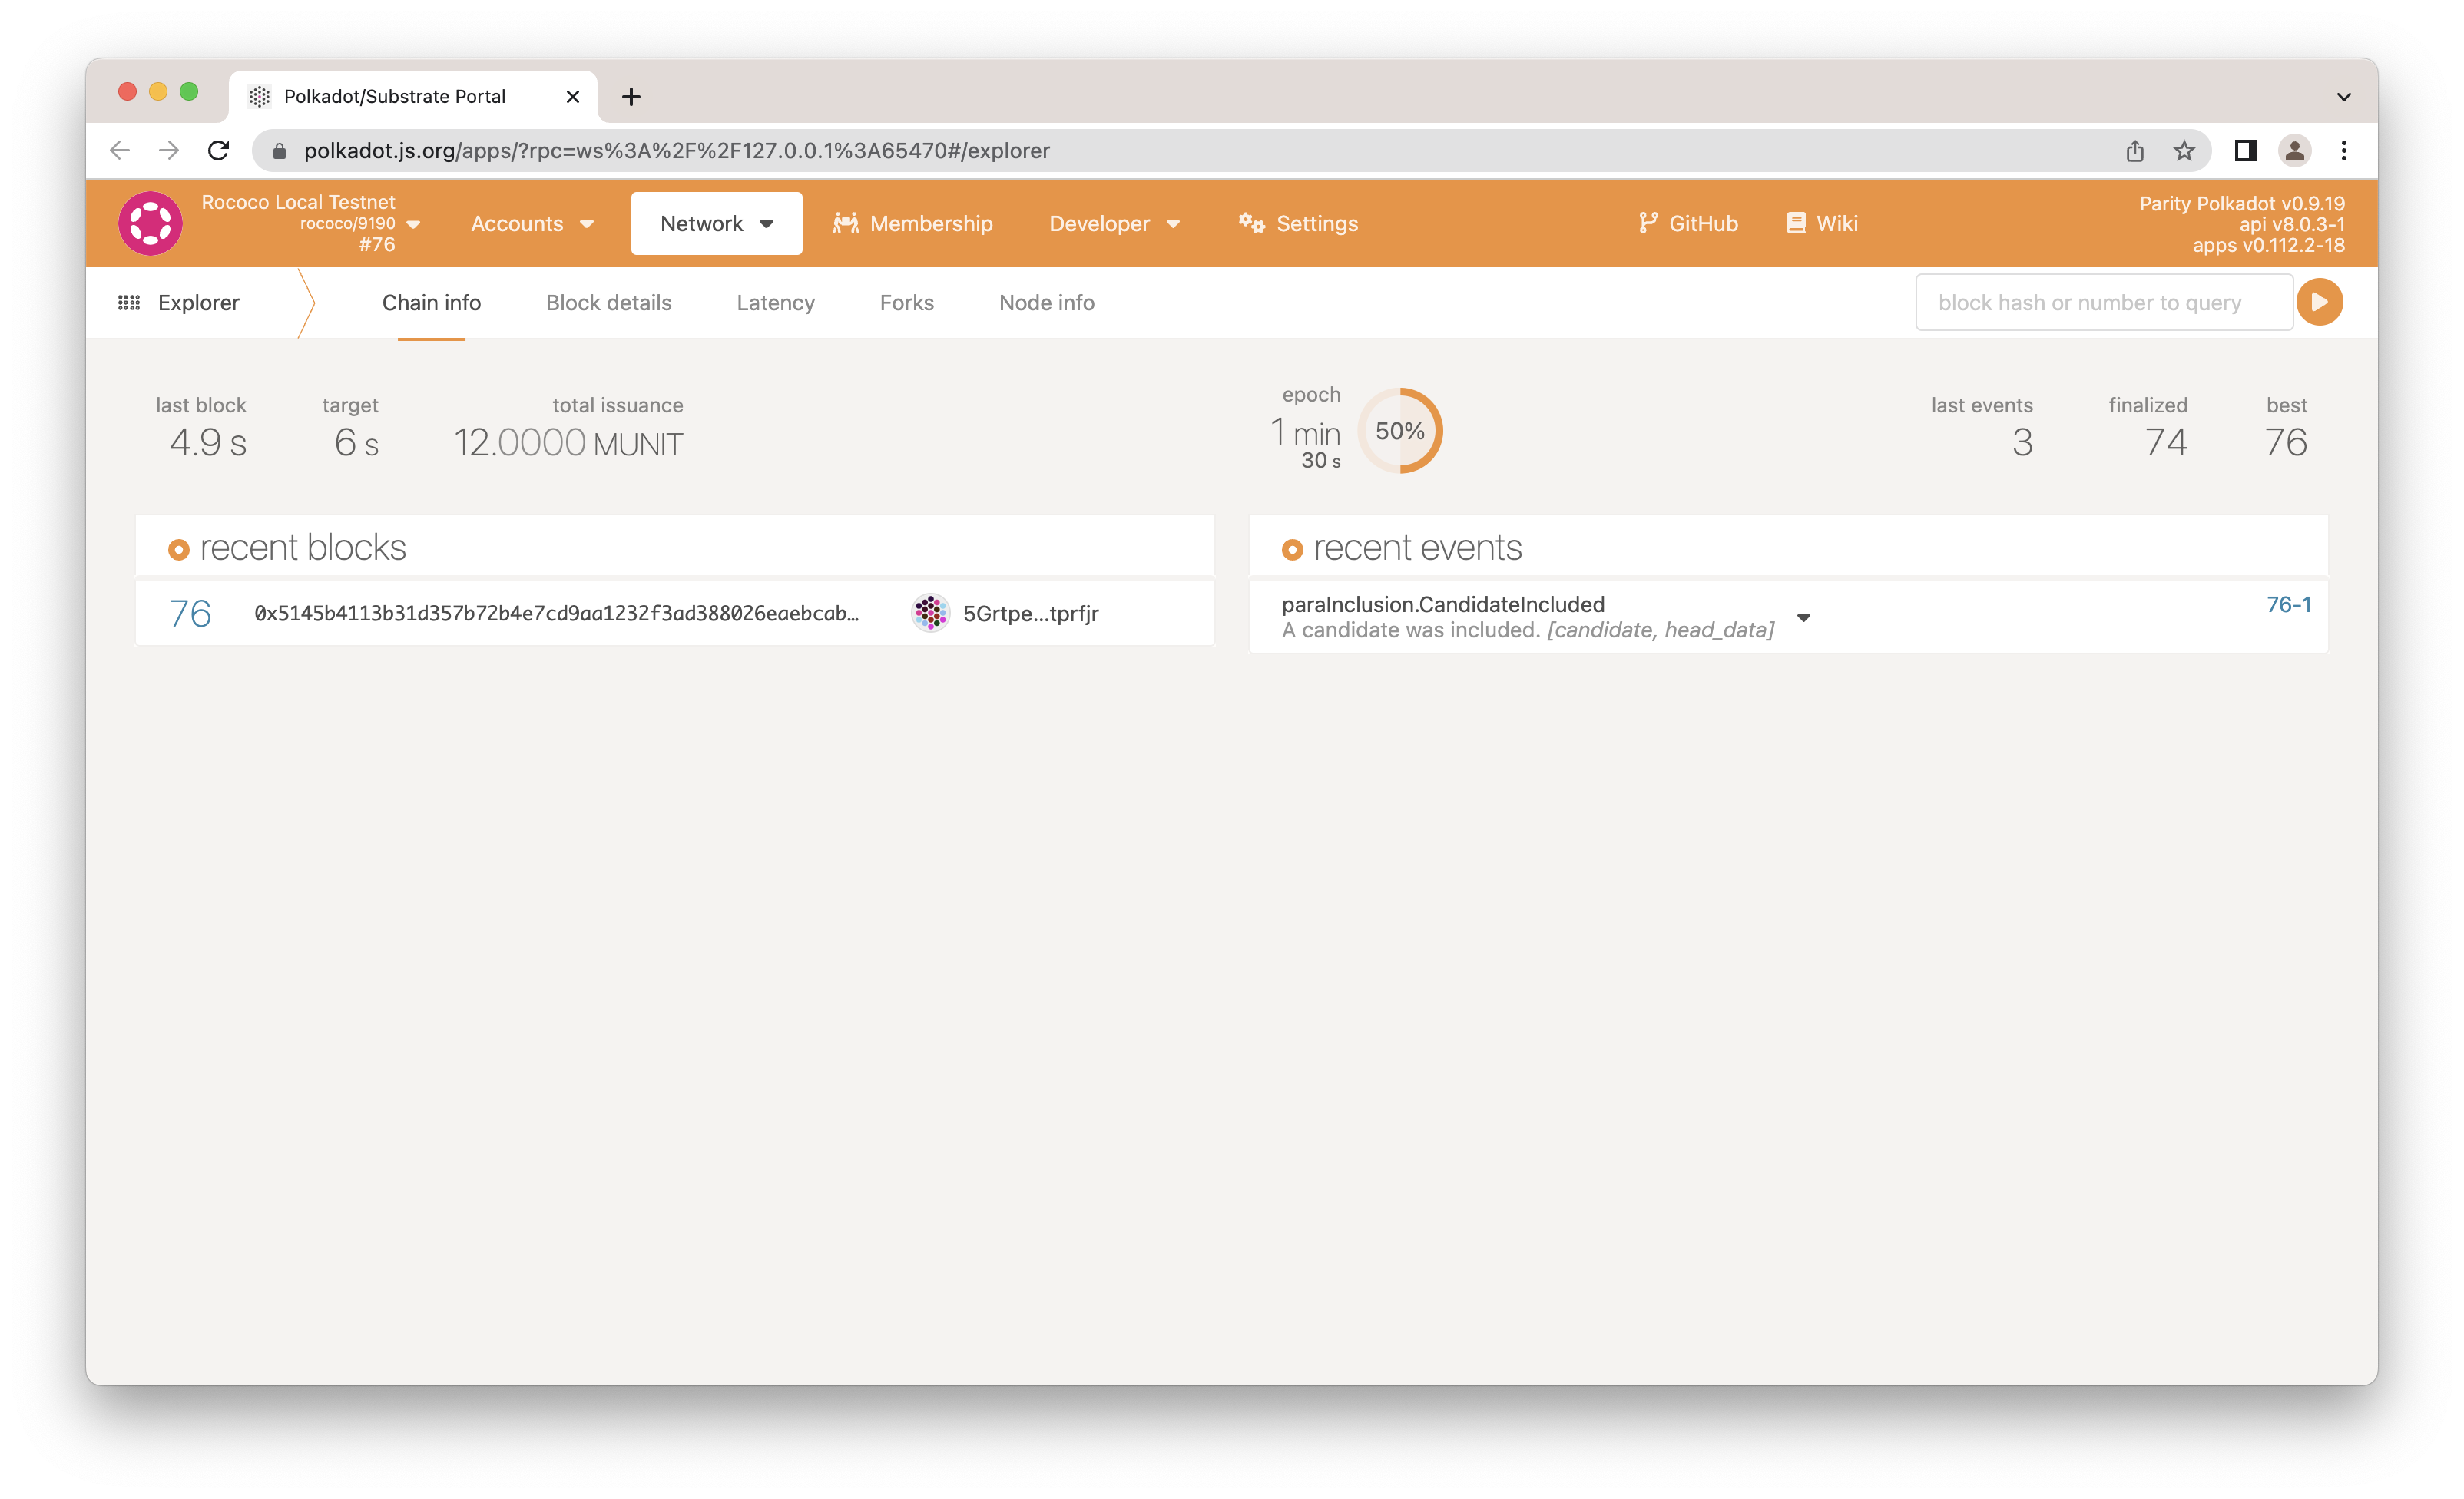
At the end of the process a list of nodes (with direct access links) will be printed. So, you can now connect to one of the nodes.
Now we've explored how to launch a network, let's add a test file to ensure that it works as expected.
In Zombienet the tests are defined in the *.zndsl file, which uses a simple DSL to write test assertions.
Description: Small Network test
Network: ./0001-small-network.toml
Creds: config

# metrics
alice: reports node_roles is 4
alice: reports sub_libp2p_is_major_syncing is 0

# histogram
alice: reports histogram polkadot_pvf_execution_time has at least 2 samples in buckets ["0.1", "0.25", "0.5", "+Inf"] within 100 seconds

# logs
bob: log line matches glob "*rted #1*" within 10 seconds
bob: log line matches "Imported #[0-9]+" within 10 seconds
bob: count of log lines matching "Error" is 0 within 10 seconds

# system events
bob: system event contains "A candidate was included" within 20 seconds
alice: system event matches glob "*was backed*" within 10 seconds

#parachain tests
alice: parachain 100 is registered within 225 seconds
alice: parachain 100 block height is at least 10 within 200 seconds
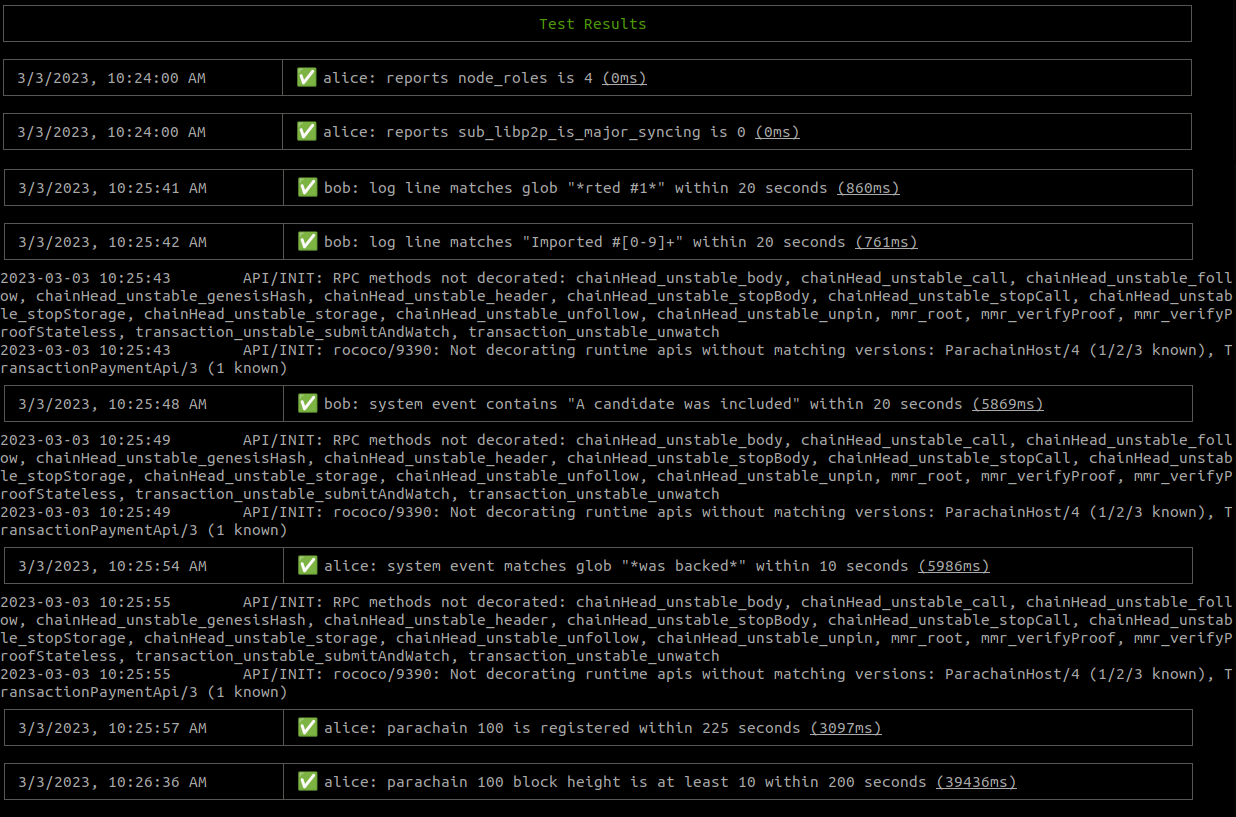
Now, run the tests with the following command to get both the launching output and the test reports:
./zombienet-linux -p kubernetes test examples/0001-small-network.zndsl
Example 2 - Small network with replacements
In Example 1, we used some hardcoded default values but sometimes it's more useful to be able to change them dynamically.
For example, if you are building images in your CI and those images have a unique tag. To address these cases, Zombienet uses a templating language called Nunjucks that allows defining environment variables which then can get updated at runtime.
Following the previous example, we will replace the images with variables that will read the value from the environment. An interesting addon test that needs to be noticed here, is that the bob validator, is using a different version of polkadot (v0.9.37) instead of the latest (which at the time of writing this documentation was v0.9.39):
0002-small-network-env-vars.toml
[relaychain]
default_image = "{{ZOMBIENET_INTEGRATION_TEST_IMAGE}}"
default_command = "polkadot"
default_args = [ "-lparachain=debug" ]

chain = "rococo-local"

  [[relaychain.nodes]]
  name = "alice"
  validator = true

  [[relaychain.nodes]]
  name = "bob"
  validator = true
  image= "{{ZOMBIENET_ALTERNATIVE_TEST_IMAGE}}"

[[parachains]]
id = 100

  [parachains.collator]
  name = "collator01"
  image = "{{ZOMBIENET_COL_IMAGE}}"
  command = "polkadot-parachain"
To spawn this network now we need to define the ZOMBIENET_INTEGRATION_TEST_IMAGE, ZOMBIENET_ALTERNATIVE_TEST_IMAGE and ZOMBIENET_COL_IMAGE environment variables.
For example:
export ZOMBIENET_INTEGRATION_TEST_IMAGE=docker.io/parity/polkadot:latest
export ZOMBIENET_ALTERNATIVE_TEST_IMAGE=docker.io/parity/polkadot:v0.9.37
export ZOMBIENET_COL_IMAGE=docker.io/parity/polkadot-parachain:latest
Now we can run this command to spawn the network:
./zombienet-linux -p kubernetes spawn examples/0002-small-network-env-vars.toml
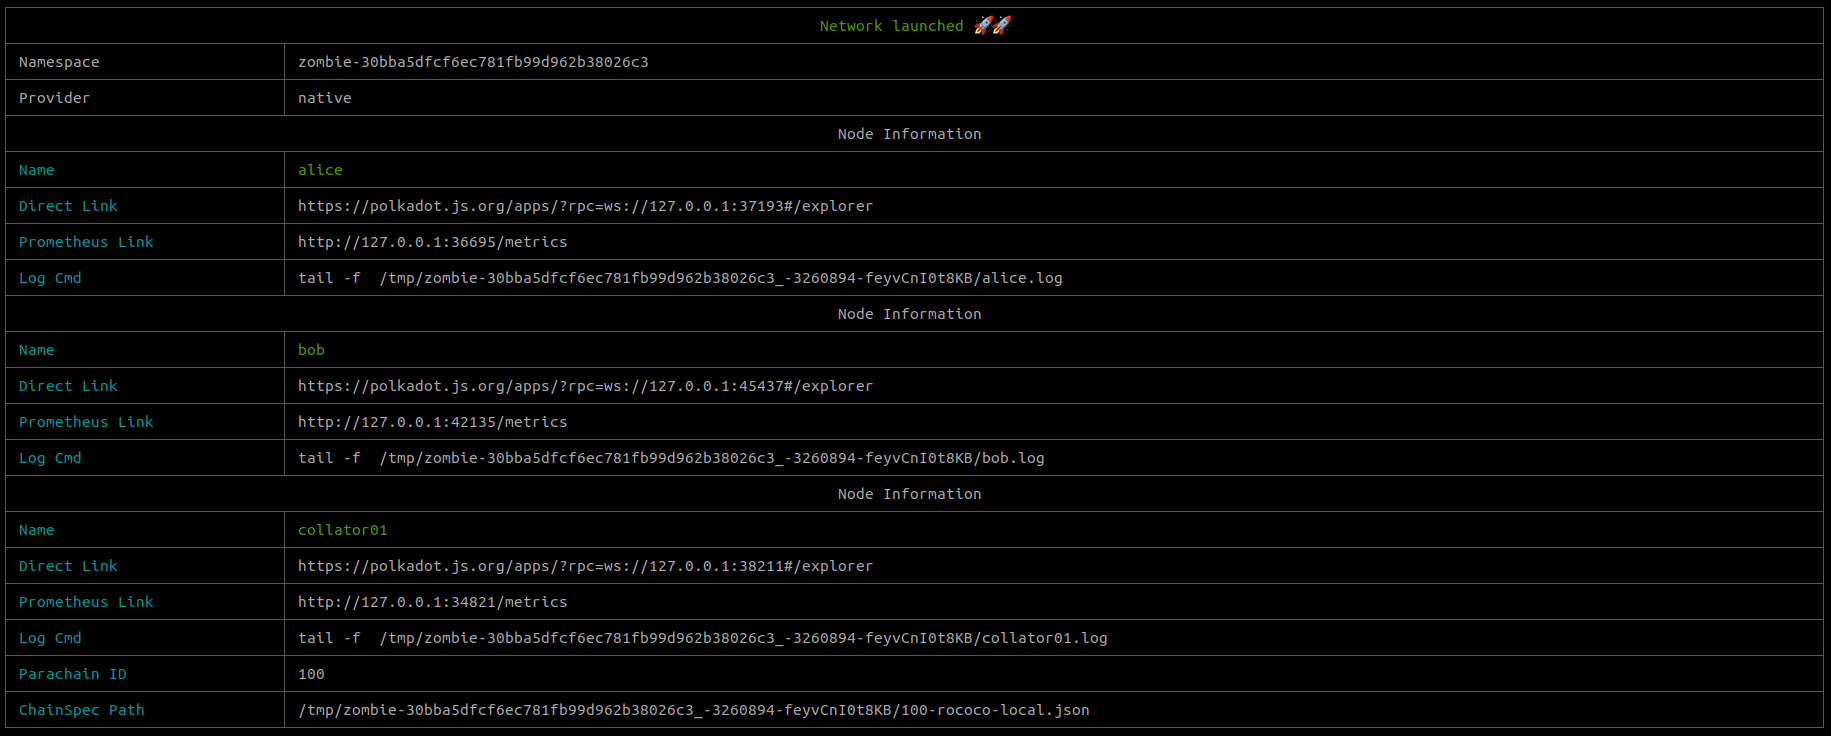
And again we get the network info with direct links:
This example shows that we can use custom environmental variables in our config file in order to dynamically alter the configuration of the network.
In addition the validators support the capability of running different versions of the image.
Note: In general all the config fields that start with
default_*can be overridden in thenodesorcollatorsconfig.
Example 3 - Big networks with groups
Sometimes you need to launch and test bigger networks and defining nodes one by one is a very manual and error prone task. For this use cases Zombienet allows to define groups of nodes, for both validators and collators.
Using the small network example as base, we can add groups to spawn a bigger network.
[relaychain]
default_image = "docker.io/paritypr/polkadot:latest"
default_command = "polkadot"
default_args = [ "-lparachain=debug" ]

chain = "rococo-local"

  [[relaychain.node_groups]]
  name = "a"
  args = [ "-lparachain=debug", "--database=paritydb-experimental" ]
  count = 5

  [[relaychain.node_groups]]
  name = "b"
  count = 5

[[parachains]]
id = 100

  [[parachains.collator_groups]]
    count = 2
    [parachains.collator_groups.collator]
    name = "collator"
    command = "polkadot-parachain"
    image = "docker.io/parity/polkadot-parachain:latest"
We use node_groups and collator_groups to define the groups we want to spawn, then Zombienet will spawn the desired count and will name the nodes/collators with the index suffix (e.g a-1).
Again, the groups use the default_* fields if they are not overridden in the group definition.
This time for spawning the network we will use the concurrency (-c) flag to spawn the nodes in batches and speed up the process.
./zombienet-linux -p kubernetes -c 5 spawn examples/0003-big-network.toml
And this time we get also a bigger output...
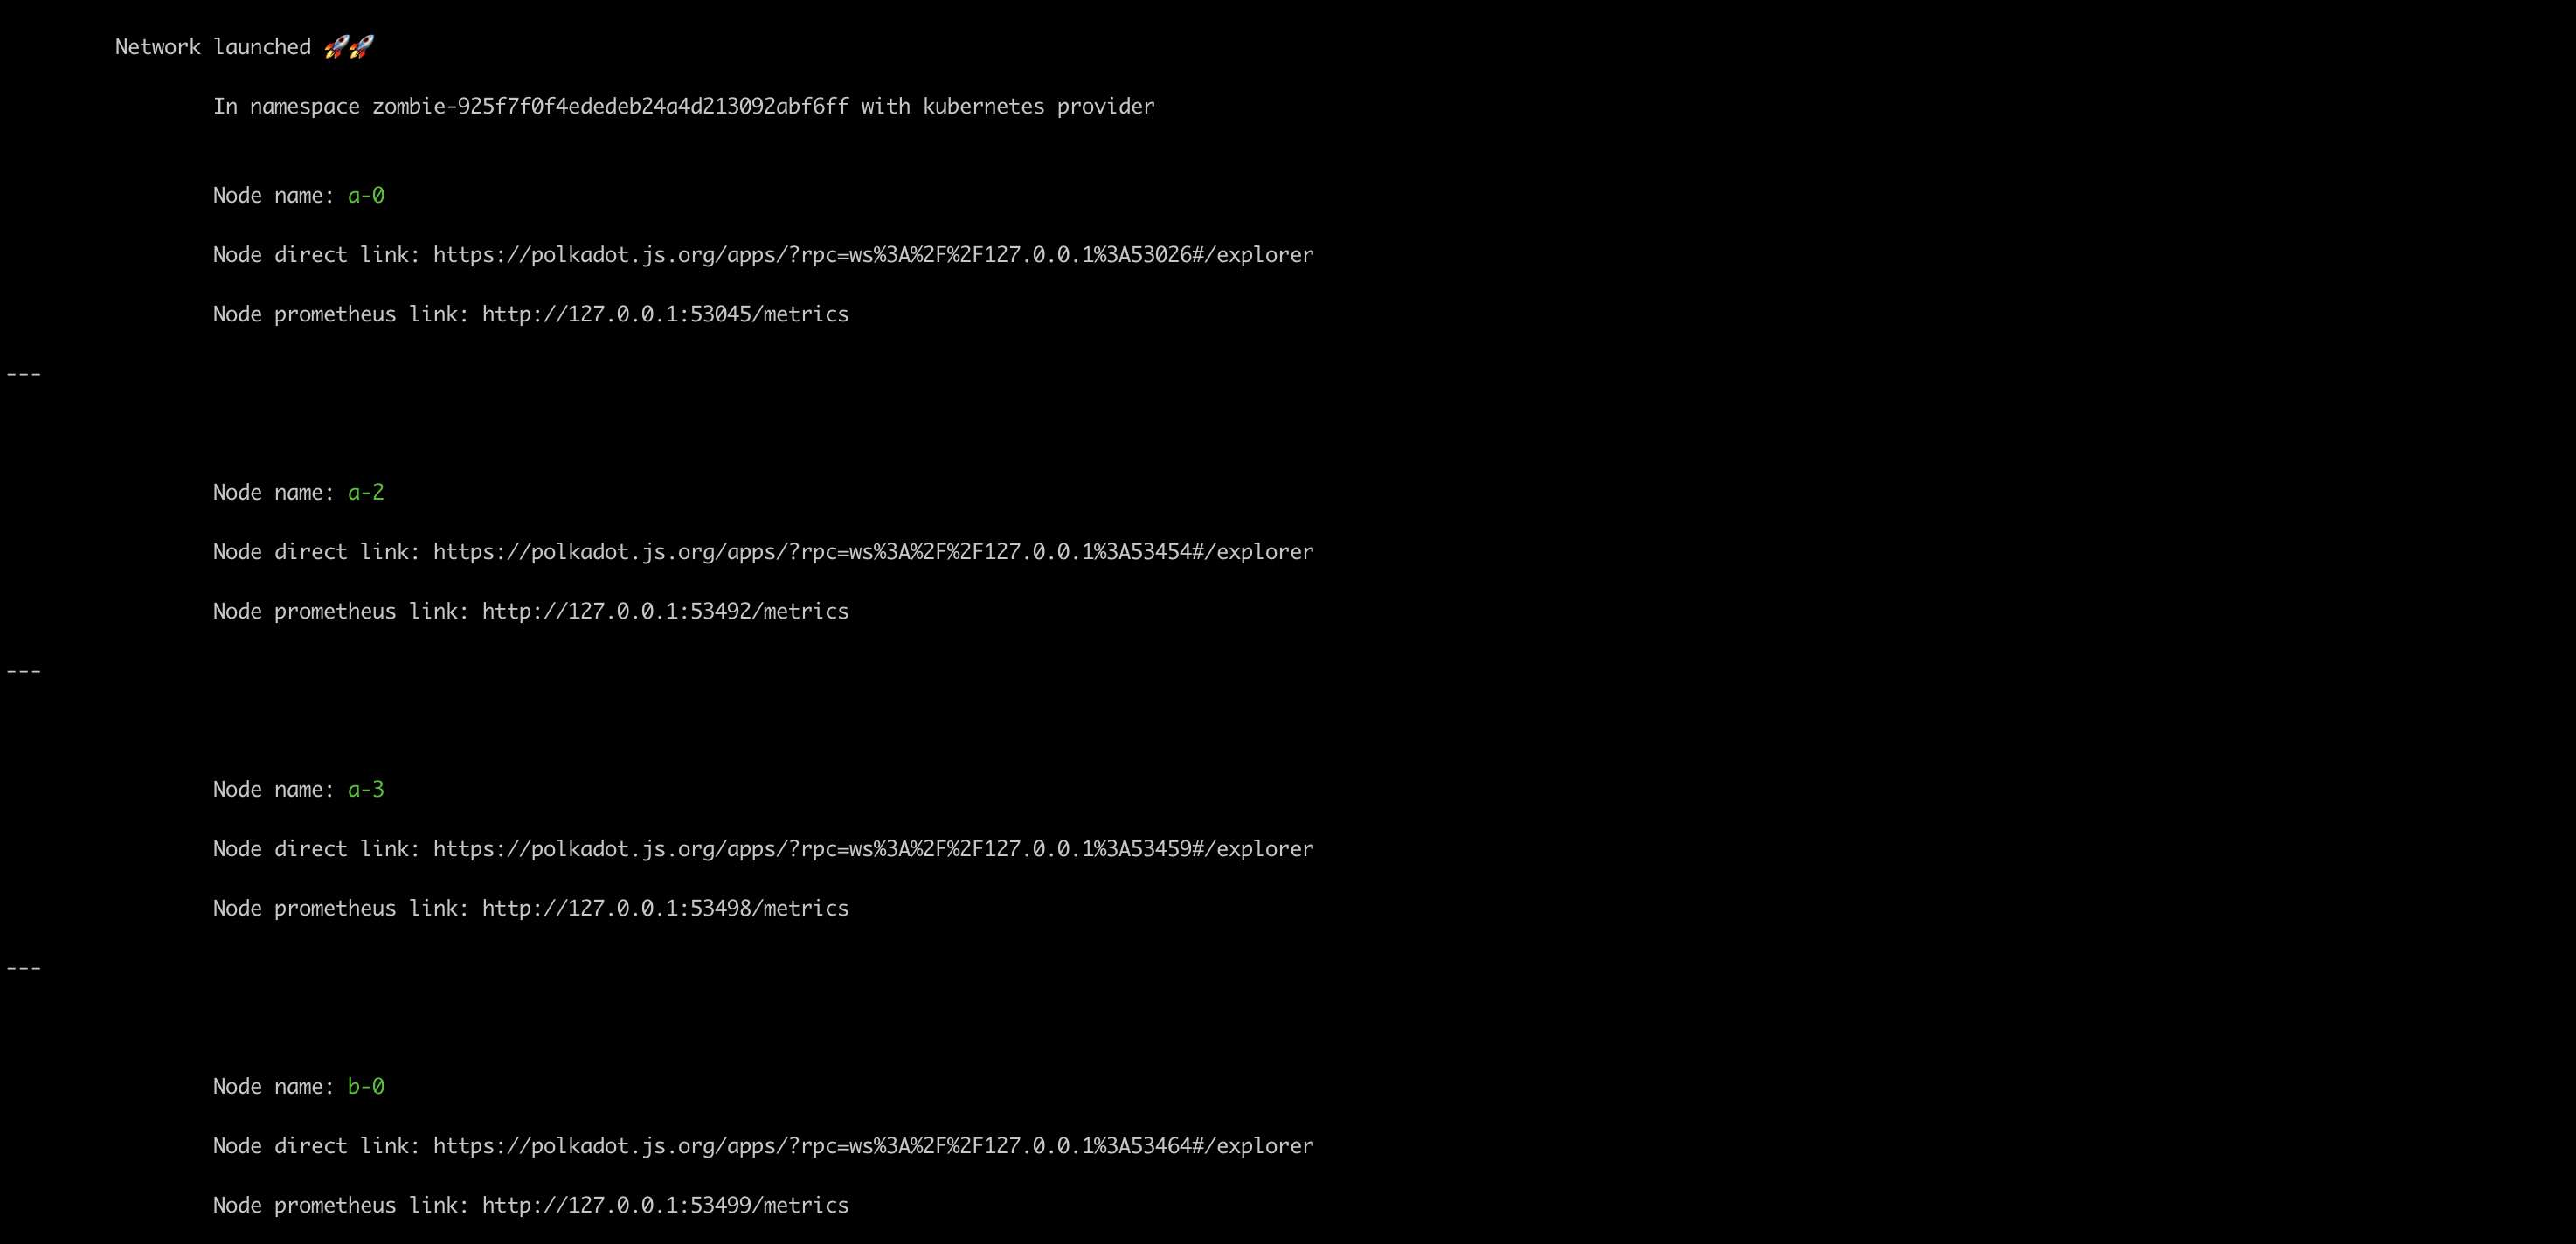
You can use the group name in the testing definition to make the same assertion on all the nodes/collators of the group.
For example:
Description: Big Network test
Network: ./0003-big-network.toml
Creds: config

# metrics
a: reports node_roles is 4
b: reports sub_libp2p_is_major_syncing is 0
And now we can run the test and get the report
./zombienet-linux -p kubernetes -c 5 test examples/0003-big-network.zndsl

Logs and troubleshooting
Node logs
Logs are always a great resource for troubleshooting. Zombienet gives you an easy way to access a node's logs in all the supported providers.
Logs in Kubernetes
Using the kubernetes provider you have a couple of options to follow the logs.
The first is using the command that zombienet suggests in the output of the running nodes:
	a-0 running

		 You can follow the logs of the node by running this command:

			 kubectl logs -f a-0
If you have a prometheus operator installed in your cluster, Zombienet will create a PodMonitor to collect all the node's logs and make it available in your Grafana dashboard which you can also use.
Logs in Podman
When you use podman you can follow the logs of the pods with the command suggestion that zombienet gives you when it spawns each pod.
    alice running

        You can follow the logs of the node by running this command:

                podman logs -f alice_pod-alice
Logs in native
With the native provider you can follow the logs of the pods with the command suggestion that zombienet gives you when it spawns a new process.
For example:
    alice running

        You can follow the logs of the node by running this command:

                tail -f /var/folders/rz/1cyx7hfj31qgb98d8_cg7jwh0000gn/T/zombie-22eaa5159aca78ff41e0249c3931b472_-91504-Ea3rT0YgKH2Y/alice.log
Troubleshooting
Zombienet provides an easy way to follow the spawning process by enabling the debug logs using the DEBUG environment variable to manage the output.
DEBUG=zombie* ./zombienet-linux -p kubernetes -c 5 test examples/0003-big-network.zndsl
Podman infra
Zombienet will automatically spawn some infrastructure pods to give the users a monitoring stack when the podman provider is used.

The grafana pod is running under the default user configuration and has prometheus and tempo already configured as datasources.