What is ZombieNet?
ZombieNet aims to be a testing framework for Substrate based blockchains, providing a simple CLI tool that allows users to spawn and test ephemeral networks. The assertions used in the tests can include on-chain storage, metrics, logs and custom JS scripts that interact with the chain. To make these easy to define, Zombienet uses a built-in natural language tool to write tests as smoothly as possible.
Internally, it's a JS library designed to run on NodeJS and support different backend providers to run the various blockchain nodes. Currently, Kubernetes, Podman and native are the supported providers.
Installation
ZombieNet releases are available in github. Each release provides executables for both linux and macos created with pkg and allows running zombienet cli without having Node.js installed. But each provider define its own requirements (e.g. k8s, podman).
Using Binaries on MacOS
After you have downloaded zombienet-macos-arm64 or zombienet-macos-x64, you will need to:
- Move the binary to your working directory.
- Rename the binary to just
zombienetwithout anymacos-<version>extension for convenience. - Enable the binary to be executable:
chmod +x ./zombienet - Remove the binary from quarantine:
xattr -d com.apple.quarantine ./zombienet
Then you should be able to access the binary:
./zombienet help
Using NPM
If you have Node.js, you can install zombienet locally via NPM:
npm i @zombienet/cli@latest -g
Then you should be able to access the zombienet command:
zombienet help
Using Nix
Nix is a package manager which is available for both linux and macos.
The ZombieNet repository provides a flake.nix file, which can be used if you have nix flakes enabled. (e.g. experimental-features = nix-command flakes is in ~/.config/nix/nix.conf). Use the flake reference github:paritytech/zombienet for the latest on main, or github:paritytech/zombienet/<tag> for a particular revision.
One way of using the nix flake is to use nix run. e.g. this command fetches the latest from main and builds zombienet:
nix run github:paritytech/zombienet -- spawn config.toml
Or a particular release can be specified. e.g. to run v1.3.40, use:
nix run github:paritytech/zombienet/v1.3.40 -- spawn config.toml
Another option is to add the zombienet binary to the PATH for the current shell. This can be done with:
nix shell github:paritytech/zombienet/v1.3.40
Kubernetes requirements
Zombienet should work with any k8s cluster (e.g GKE, docker-desktop, kind) but you need to have kubectl installed to interact with your cluster.
Also, you need permission to create resources (e.g namespaces, pods and cronJobs) in the target cluster.
Using Zombienet GKE cluster (internally).
The Zombienet project has it's own k8s cluster in GCP, to use it please ping Javier (@javier:matrix.parity.io) in Element to get access and learn how to use it.
Podman requirements
Zombienet supports Podman rootless as provider.
You only need to have podman installed in your environment to use it and either set it in the network file or with the --provider flag in the CLI.
Note: Currently, it is only possible to use podman for Zombienet users on Linux machines.
Although podman comes with support for macOS, it is done using an internal VM and the Zombienet provider code expects podman to be running natively.
There is actually an issue with versions of podman >3 preventing to run the prometheus pods. We are working on the issue.
Native requirements
The Zombienet Native provider allows running the nodes as local process in your environments. You only need to have the binaries used in your network (e.g polkadot, adder-collator).
To use it either configure your network file or with the --provider flag in the CLI.
NOTE: The native provider only uses the command config for nodes/collators, both relative and absolute paths are supported. You can use the default_command config to set the binary to spawn all the nodes in the relay chain.
Alternative: You can set the command to the binary directly if is available in your PATH.
Features by providers
Each of the supported providers define a set of features beside the spawning and testing, at the moment those features are related to the monitoring side infra available for each one but will be expanded to support a set of companions.
Kubernetes
With k8s ZombieNet use Prometheus operator (if is available) to offload the monitoring/visibility layer, so only the network's pods are deployed.
Podman
With podman ZombieNet deploy a couple of extra pods to add a layer of monitoring/visibility to the running network. In particular pods for prometheus, tempo and grafana are deployed. Also, grafana is configured to have prometheus and tempo as datasource.
To access those services you can find the url in the output of zombinet
  Monitor: prometheus - url: http://127.0.0.1:34123

  Monitor: tempo - url: http://127.0.0.1:34125

  Monitor: grafana - url: http://127.0.0.1:41461
Note: Grafana is deployed with the default admin access.
Once the network is stopped, by ctrl+c on a running spawn or by finishing the test, these pods are removed with the rest of the pods launched by ZombieNet.
Native
Native provider doesn't run any extra layer/process at the moment.
Cli usage
For this example we will use the macos version of the executable
./zombienet-macos
Usage: zombienet [options] [command]

Options:
  -c, --spawn-concurrency <concurrency>  Number of concurrent spawning process to launch, default is 1
  -p, --provider <provider>              Override provider to use (choices: "podman","kubernetes", "native", default: kubernetes)
  -d, --dir <path>                       Directory path for placing the network files instead of random temp one (e.g. -d /home/user/my-zombienet)
   -l, --logType <logType>"               Type of logging on the console - defaults to 'table'" (choices: "table", "text", "silent")
  -f, --force                            Force override all prompt commands
  -m, --monitor                          Start as monitor, do not auto cleanup network
  -h, --help                             display help for command

Commands:
  spawn <networkConfig> [creds]          Spawn the network defined in the config
  test <testFile> [runningNetworkSpec]   Run tests on the network defined
  setup <binaries...>                    Setup is meant for downloading and making dev environment of ZombieNet ready
  version                                Prints zombienet version
  help [command]                         display help for command

Debug:
  The debug/verbose output is managed by the DEBUG environment variable, you can enable/disable specific debugging namespaces setting an space or comma-delimited names.
  $ e.g $ DEBUG=zombie, zombie::paras zombienet spawn example/0001-example.toml

  The available namespaces are:
  zombie
  zombie::chain
  zombie::cmdGenerator
  zombie::config
  zombie::helper
  zombie::js
  zombie::kube
  zombie::metrics
  zombie::native
  zombie::network
  zombie::paras
  zombie::podman
  zombie::spawner
  zombie::substrateCliArgsVersion
  zombie::test

  NOTE: wildcard (e.g.'zombie*') are supported, for advance use check https://www.npmjs.com/package/debug#wildcards
Convert
The convert command is a CLI command designed to help users convert their a Polkadot Launch configuration to the Zombienet configuration format. This tool is especially helpful for developers to migrate their projects to to Zombienet, without the need to manually rewrite their configurations.
Usage
zombienet convert <INPUT_FILE>
Note: Where <INPUT_FILE> is a Polkadot Launch configuration with a .js or .json extension defined by this type
Example
Suppose you have a Polkadot Launch configuration file named my-project-config.json. To convert it to a Zombienet configuration file named my-project-config-zombienet.json, run:
zombienet convert my-project-config.json
Notes
- The
convertcommand will attempt to preserve as much information as possible from the original Polkadot Launch configuration file. However, due to the differences in the configuration structure and options between the two systems, some manual adjustments may be necessary after the conversion. - It is recommended to thoroughly review the generated Zombienet configuration file to ensure that all the settings are correct and to make any necessary adjustments before using it to deploy your project.
Setup
This command will help you to easily download latest artifacts and make them executable in order to use them with zombienet
Download and install needed artifacts
For easier and faster setup of local environment, you can run:
❯ zombienet setup

Setup is meant for downloading and making everything ready for dev environment of ZombieNet;

You can use the following arguments:
  binaries    the binaries that you want to be downloaded, provided in a row without any separators;
              They are downloaded in current directory and appropriate executable permissions are assigned.
              Possible options: 'polkadot', 'polkadot-parachain'
              > zombienet setup polkadot polkadot-parachain
Script above will retrieve the binaries provided and try to download and prepare those binaries for usage. At the end of the download, script will provide a command to run in your local environment in order to add the directory where the binaries were downloaded in your $PATH var:
e.g.
Please add the dir to your $PATH by running the command: export PATH=/home/<user>/<current_directory>/dist:$PATH
Command example (Linux):
➜ zombienet setup polkadot polkadot-parachain
Output example (Linux):
Setup will start to download binaries:
- polkadot 	 Approx. size  113  MB
- polkadot-parachain 	 Approx. size  120  MB
Total approx. size:  233 MB
Do you want to continue? (y/n)y

Start download...

-> downloading [========================================] 100% 0.0s
Binary "polkadot-parachain" downloaded
Giving permissions to "polkadot-parachain"
-> downloading [========================================] 100% 0.0s
Binary "polkadot" downloaded
Giving permissions to "polkadot"
Please add the dir to your $PATH by running the command:
 export PATH=/home/<username>/zombienet/dist:$PATH
Note for MacOs users: As of the time of this writing, polkadot binary is not currently supported for MacOs. As a result users of MacOS need to clone the Polkadot repo,create a release and add it in your PATH manually (setup will advice you so as well).
Spawning
One of the goal of ZombieNet is easily spawn ephemeral networks, providing a simple but powerful cli that allows you to declare the desired network in toml or json format. You can check the definition spec to view the available options.
A minimal configuration example with two validators and one parachain:
[settings]
timeout = 1000

[relaychain]
default_image = "paritypr/polkadot-debug:master"
chain = "rococo-local"

  [[relaychain.nodes]]
  name = "alice"

  [[relaychain.nodes]]
  name = "bob"

[[parachains]]
id = 100

  [parachains.collator]
  name = "collator01"
  image = "paritypr/colander:4131-ccd09bbf"
  command = "adder-collator"
Then you can spawn the network by running the following command:
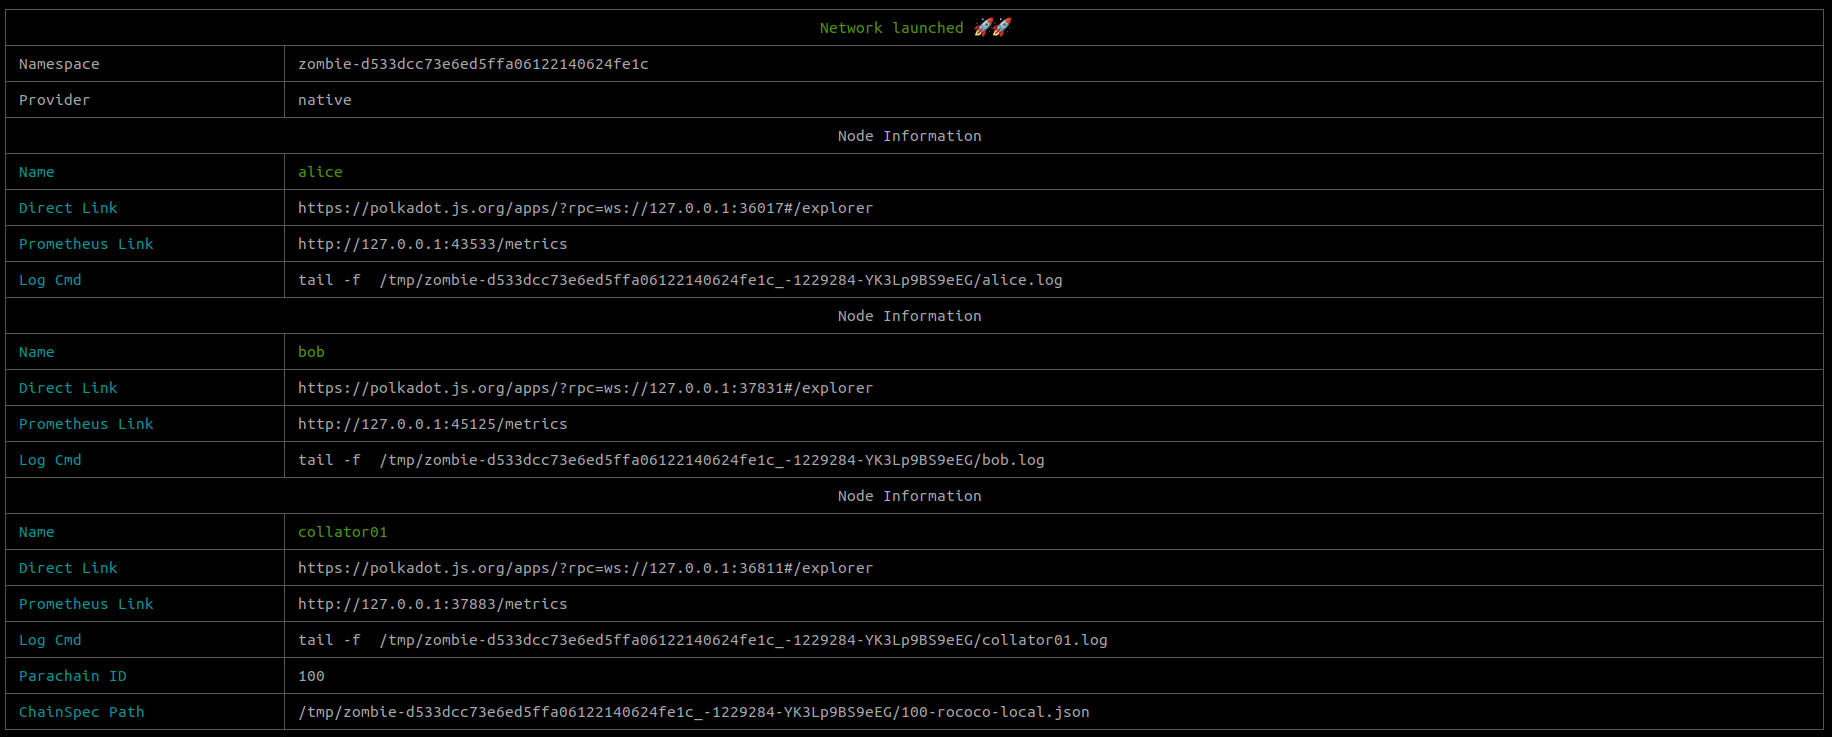
./zombienet-macos spawn examples/0001-small-network.toml
You can follow the output of the steps to spawn the network and once the network is launched a message with the nodes information like this one is show
┌───────────────────────────────────────────────────────────────────────────────────────────────────────────────────┐
│                                                       Network launched 🚀🚀                                                            |
├─────────────────────────┬─────────────────────────────────────────────────────────────────────────────────────────┤
│ Namespace                    | zombie-0c26e3512b222b8cd7053d4f632f0b62                                                                 |
├─────────────────────────┬─────────────────────────────────────────────────────────────────────────────────────────┤
│ Provider                     | native                                                                                                  |
├─────────────────────────┴─────────────────────────────────────────────────────────────────────────────────────────┤
│                                                         Node Information                                                               |
├─────────────────────────┬─────────────────────────────────────────────────────────────────────────────────────────┤
│ Name                         | alice                                                                                                   |
├─────────────────────────┬─────────────────────────────────────────────────────────────────────────────────────────┤
│ Direct Link                  | https://polkadot.js.org/apps/?rpc=ws://127.0.0.1:43185#/explorer                                        |
├─────────────────────────┬─────────────────────────────────────────────────────────────────────────────────────────┤
│ Prometheus Link              | http://127.0.0.1:44521/metrics                                                                          |
├─────────────────────────┴─────────────────────────────────────────────────────────────────────────────────────────┤
│                                                         Node Information                                                               |
├─────────────────────────┬─────────────────────────────────────────────────────────────────────────────────────────┤
│ Name                         | bob                                                                                                     |
├─────────────────────────┼─────────────────────────────────────────────────────────────────────────────────────────┤
│ Direct Link                  | https://polkadot.js.org/apps/?rpc=ws://127.0.0.1:45645#/explorer                                        |
├─────────────────────────┼─────────────────────────────────────────────────────────────────────────────────────────┤
│ Prometheus Link              | http://127.0.0.1:38901/metrics                                                                          |
├─────────────────────────┴─────────────────────────────────────────────────────────────────────────────────────────┤
│                                                         Node Information                                                               |
├─────────────────────────┬─────────────────────────────────────────────────────────────────────────────────────────┤
│ Name                         | collator01                                                                                              |
├─────────────────────────┼─────────────────────────────────────────────────────────────────────────────────────────┤
│ Direct Link                  | https://polkadot.js.org/apps/?rpc=ws://127.0.0.1:37543#/explorer                                        |
├─────────────────────────┼─────────────────────────────────────────────────────────────────────────────────────────┤
│ Prometheus Link              | http://127.0.0.1:44807/metrics                                                                          |
├─────────────────────────┼─────────────────────────────────────────────────────────────────────────────────────────┤
│ Parachain ID                 | 100                                                                                                     |
├─────────────────────────┼─────────────────────────────────────────────────────────────────────────────────────────┤
│ ChainSpec Path               | /tmp/zombie-0c26e3512b222b8cd7053d4f632f0b62_-20554-cMuCmVc8OQ7f/rococo-local-100.json                  │
└─────────────────────────┴─────────────────────────────────────────────────────────────────────────────────────────┘
Both the prometheus and the node links are accessible in your local machine to get the metrics or connect to the node.
Using env vars
ZombieNet can also make replacements in the network config using env variables. To define a replacement you need to use the {{ENV_VAR_NAME}} syntax.
For example, from the previous example but using env variables could be:
[relaychain]
default_image = "{{ZOMBIENET_INTEGRATION_TEST_IMAGE}}"
chain = "rococo-local"

  [[relaychain.nodes]]
  name = "alice"

  [[relaychain.nodes]]
  name = "bob"

[[parachains]]
id = 100
add_to_genesis = false

  [parachains.collator]
  name = "collator01"
  image = "{{COL_IMAGE}}"
  command = "adder-collator"
Then you can export the needed values before run the command to spawn the network again:
export ZOMBIENET_INTEGRATION_TEST_IMAGE=docker.io/paritypr/polkadot-debug:master
export COL_IMAGE=docker.io/paritypr/colander:4131-ccd09bbf

./zombienet-macos spawn examples/0001-small-network.toml
Teardown
You can teardown the network (and cleanup the used resources) by terminating the process (Ctrl+c).
Testing
The other goal of ZombieNet is to provide a way to perform test/assertions against the spawned network, using a set of natural language expressions that allow making assertions based on metrics, logs and some built-in function that query the network using polkadot.js.
Those assertions should be defined in a feature test, and the dsl and format is documented in here.
The following is a small example to spawn a network (using the previous simple network definition) and assert that:
- Both
nodesare running - The defined
parachainis registered - The defined
parachainis producing blocks and produced at least 10 within 200 seconds.
Description: Simple Network Smoke Test
Network: ./0001-small-network.toml
Creds: config


alice: is up
bob: is up
alice: parachain 100 is registered within 225 seconds
alice: parachain 100 block height is at least 10 within 200 seconds
Other examples are provided in the examples directory.
Zombienet guide
Intro
Zombienet was designed to be a flexible and easy to use tool, allowing users to describe complex network configurations that work across supported providers (e.g k8s, podman, native) and write tests in an intuitive way. The end goal is to create a smooth experience for parachain developers, giving them the confidence and simplicity to build and ship.
In this guide we will go through simple use cases as well as more complex ones, describing the trade-offs made and the current constraints for both network configurations and test specifications.
Example 0 - Different configuration file types (2 validators)
In this example, is shown the alternative options of a configuration file. The different extensions supported are: yaml, json and of course .toml.
This simple config exists only in order to show how the same configuration exists in 3 different formats, and thus uses only 1 relay chain (rococo-local) with 2 nodes (alice and bob);
The configuration files are:
- 0000-test-config-small-network.json;
- 0000-test-config-small-network.yaml;
- 0000-test-config-small-network.toml;
and the test files for running each configuration are:
- 0000-test-json-config-small-network.zndsl;
- 0000-test-yaml-config-small-network.zndsl;
- 0000-test-toml-config-small-network.zndsl;
respectively.
Each .zndsl file contains at the header part of the file the:
Network: ./0000-test-config-small-network.json
that describes which config file will be used for the test.
To run the three tests (assuming the native provider is used) just execute the following commands for each test:
./zombienet-linux -p native test examples/0000-test-json-config-small-network.zndsl
./zombienet-linux -p native test examples/0000-test-yaml-config-small-network.zndsl
./zombienet-linux -p native test examples/0000-test-toml-config-small-network.zndsl
Note: remember to use
-p podmanfor Podman as provider, while no-poption as default is thekubernetesone.
Example 1 - Small network (2 validators/ 1 parachain)
In this example small-network, we define a network (rococo-local) with two validators (alice/bob) and a parachain (paraId 100). Both of the validators are using the default image, command and args.
[relaychain]
default_image = "docker.io/parity/polkadot:latest"
default_command = "polkadot"
default_args = [ "-lparachain=debug" ]

chain = "rococo-local"

  [[relaychain.nodes]]
  name = "alice"
  validator = true

  [[relaychain.nodes]]
  name = "bob"
  validator = true

[[parachains]]
id = 100

  [parachains.collator]
  name = "collator01"
  image = "docker.io/parity/polkadot-parachain:latest"
  command = "polkadot-parachain"
  args = ["-lparachain=debug"]
Using kubernetes as provider we can simply spawn this network by running:
./zombienet-linux -p kubernetes spawn examples/0001-small-network.toml
or simpler, since kubernetes is the default provider as:
./zombienet-linux spawn examples/0001-small-network.toml
You will see how zombienet starts creating the needed resources to launch the network.
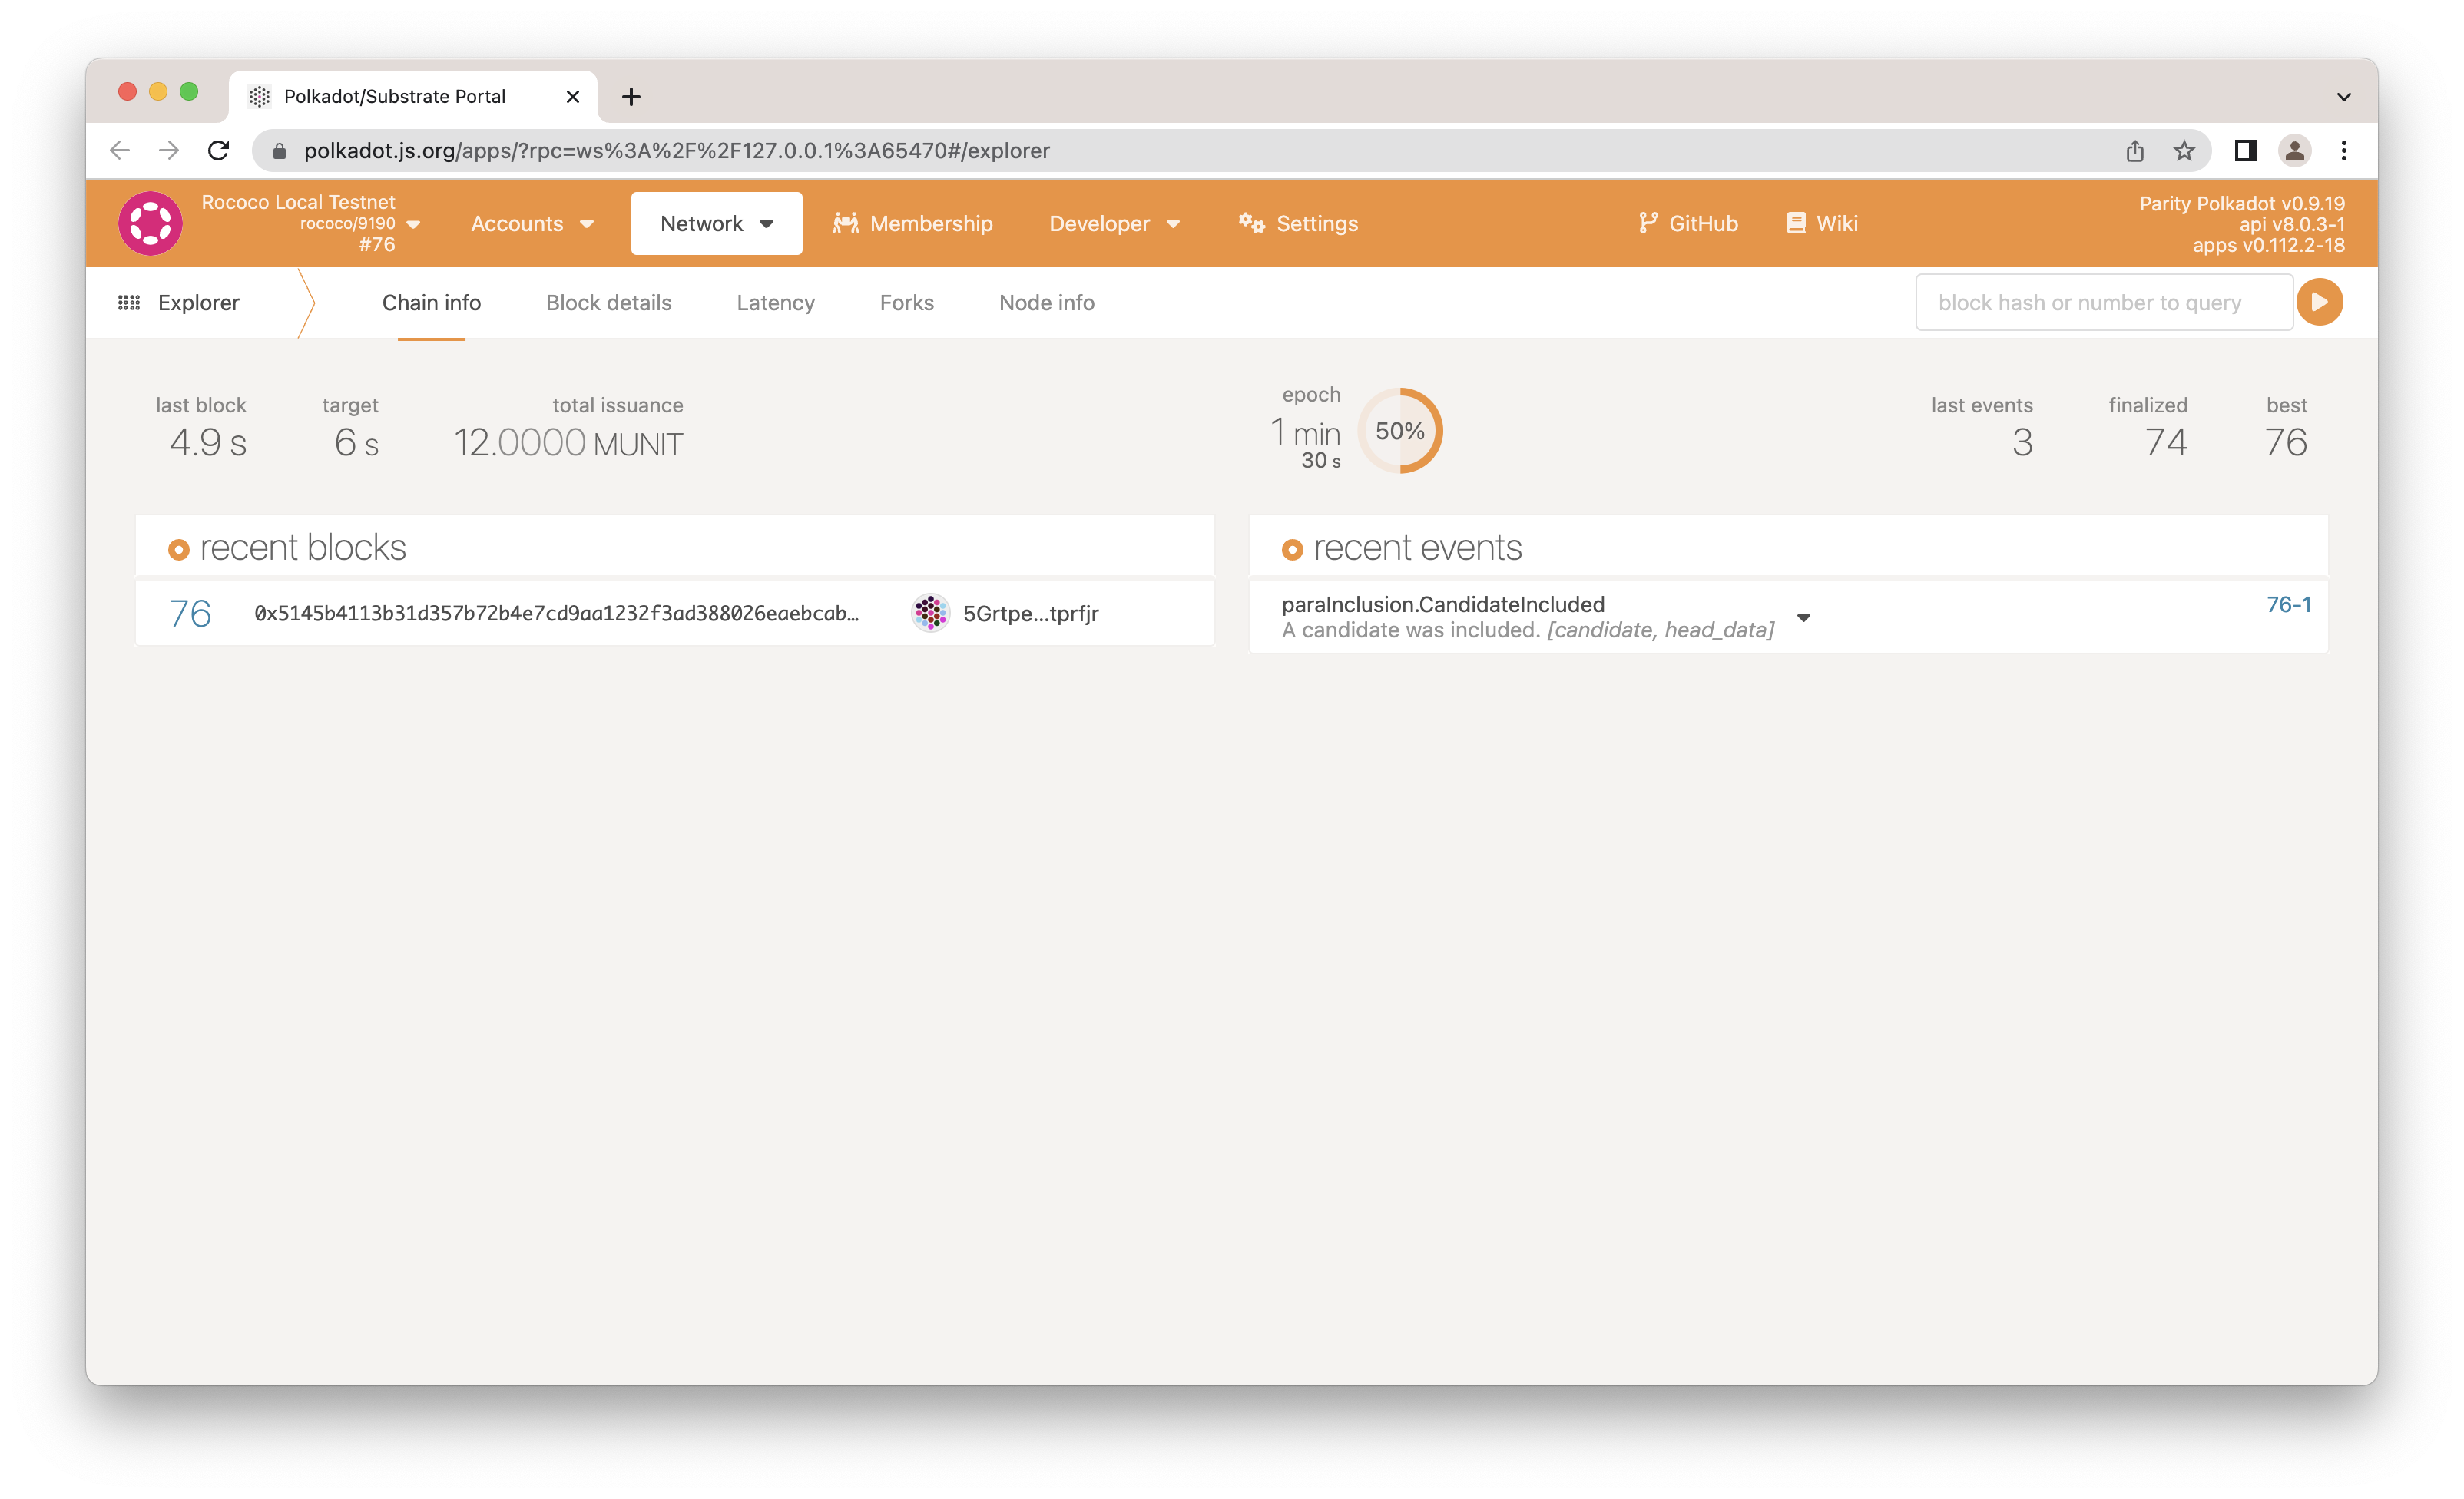
At the end of the process a list of nodes (with direct access links) will be printed. So, you can now connect to one of the nodes.
Now we've explored how to launch a network, let's add a test file to ensure that it works as expected.
In Zombienet the tests are defined in the *.zndsl file, which uses a simple DSL to write test assertions.
Description: Small Network test
Network: ./0001-small-network.toml
Creds: config

# metrics
alice: reports node_roles is 4
alice: reports sub_libp2p_is_major_syncing is 0

# histogram
alice: reports histogram polkadot_pvf_execution_time has at least 2 samples in buckets ["0.1", "0.25", "0.5", "+Inf"] within 100 seconds

# logs
bob: log line matches glob "*rted #1*" within 10 seconds
bob: log line matches "Imported #[0-9]+" within 10 seconds
bob: count of log lines matching "Error" is 0 within 10 seconds

# system events
bob: system event contains "A candidate was included" within 20 seconds
alice: system event matches glob "*was backed*" within 10 seconds

#parachain tests
alice: parachain 100 is registered within 225 seconds
alice: parachain 100 block height is at least 10 within 200 seconds
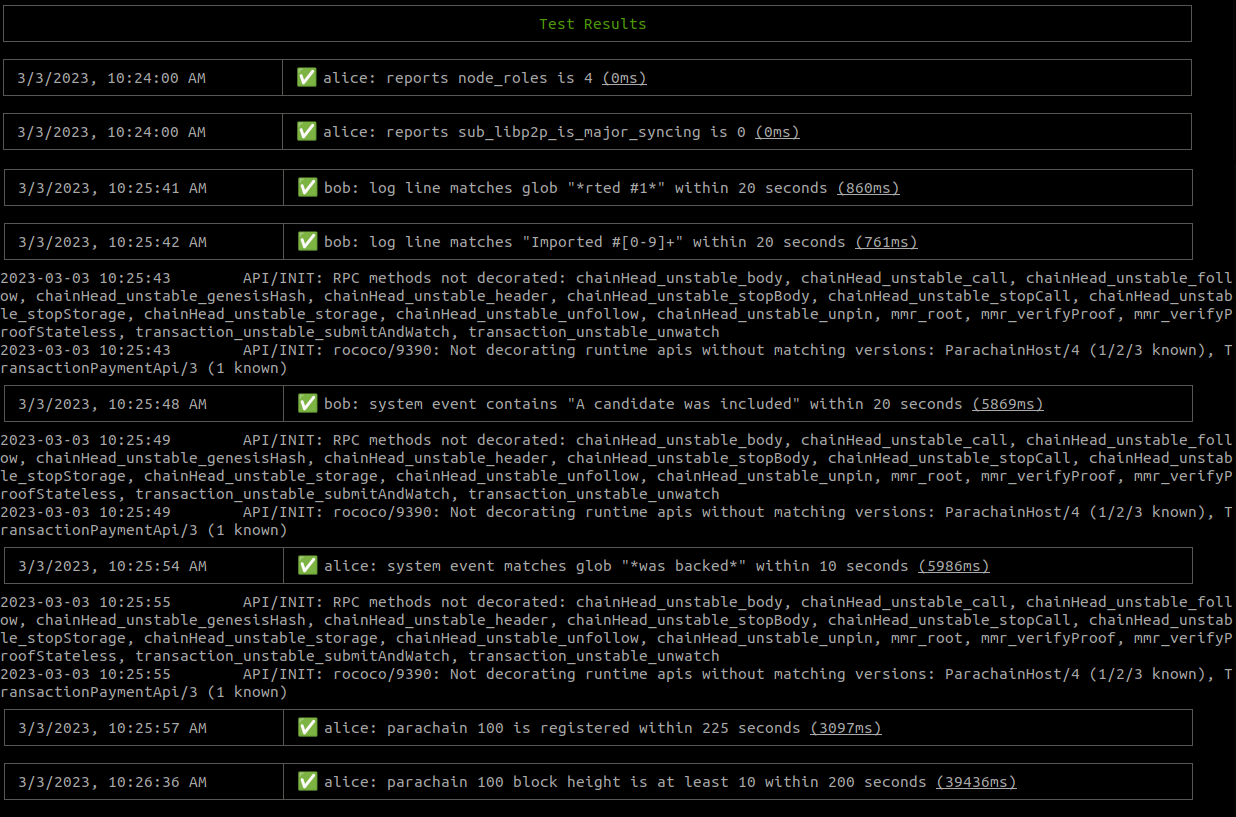
Now, run the tests with the following command to get both the launching output and the test reports:
./zombienet-linux -p kubernetes test examples/0001-small-network.zndsl
Example 2 - Small network with replacements
In Example 1, we used some hardcoded default values but sometimes it's more useful to be able to change them dynamically.
For example, if you are building images in your CI and those images have a unique tag. To address these cases, Zombienet uses a templating language called Nunjucks that allows defining environment variables which then can get updated at runtime.
Following the previous example, we will replace the images with variables that will read the value from the environment. An interesting addon test that needs to be noticed here, is that the bob validator, is using a different version of polkadot (v0.9.37) instead of the latest (which at the time of writing this documentation was v0.9.39):
0002-small-network-env-vars.toml
[relaychain]
default_image = "{{ZOMBIENET_INTEGRATION_TEST_IMAGE}}"
default_command = "polkadot"
default_args = [ "-lparachain=debug" ]

chain = "rococo-local"

  [[relaychain.nodes]]
  name = "alice"
  validator = true

  [[relaychain.nodes]]
  name = "bob"
  validator = true
  image= "{{ZOMBIENET_ALTERNATIVE_TEST_IMAGE}}"

[[parachains]]
id = 100

  [parachains.collator]
  name = "collator01"
  image = "{{ZOMBIENET_COL_IMAGE}}"
  command = "polkadot-parachain"
To spawn this network now we need to define the ZOMBIENET_INTEGRATION_TEST_IMAGE, ZOMBIENET_ALTERNATIVE_TEST_IMAGE and ZOMBIENET_COL_IMAGE environment variables.
For example:
export ZOMBIENET_INTEGRATION_TEST_IMAGE=docker.io/parity/polkadot:latest
export ZOMBIENET_ALTERNATIVE_TEST_IMAGE=docker.io/parity/polkadot:v0.9.37
export ZOMBIENET_COL_IMAGE=docker.io/parity/polkadot-parachain:latest
Now we can run this command to spawn the network:
./zombienet-linux -p kubernetes spawn examples/0002-small-network-env-vars.toml
And again we get the network info with direct links:
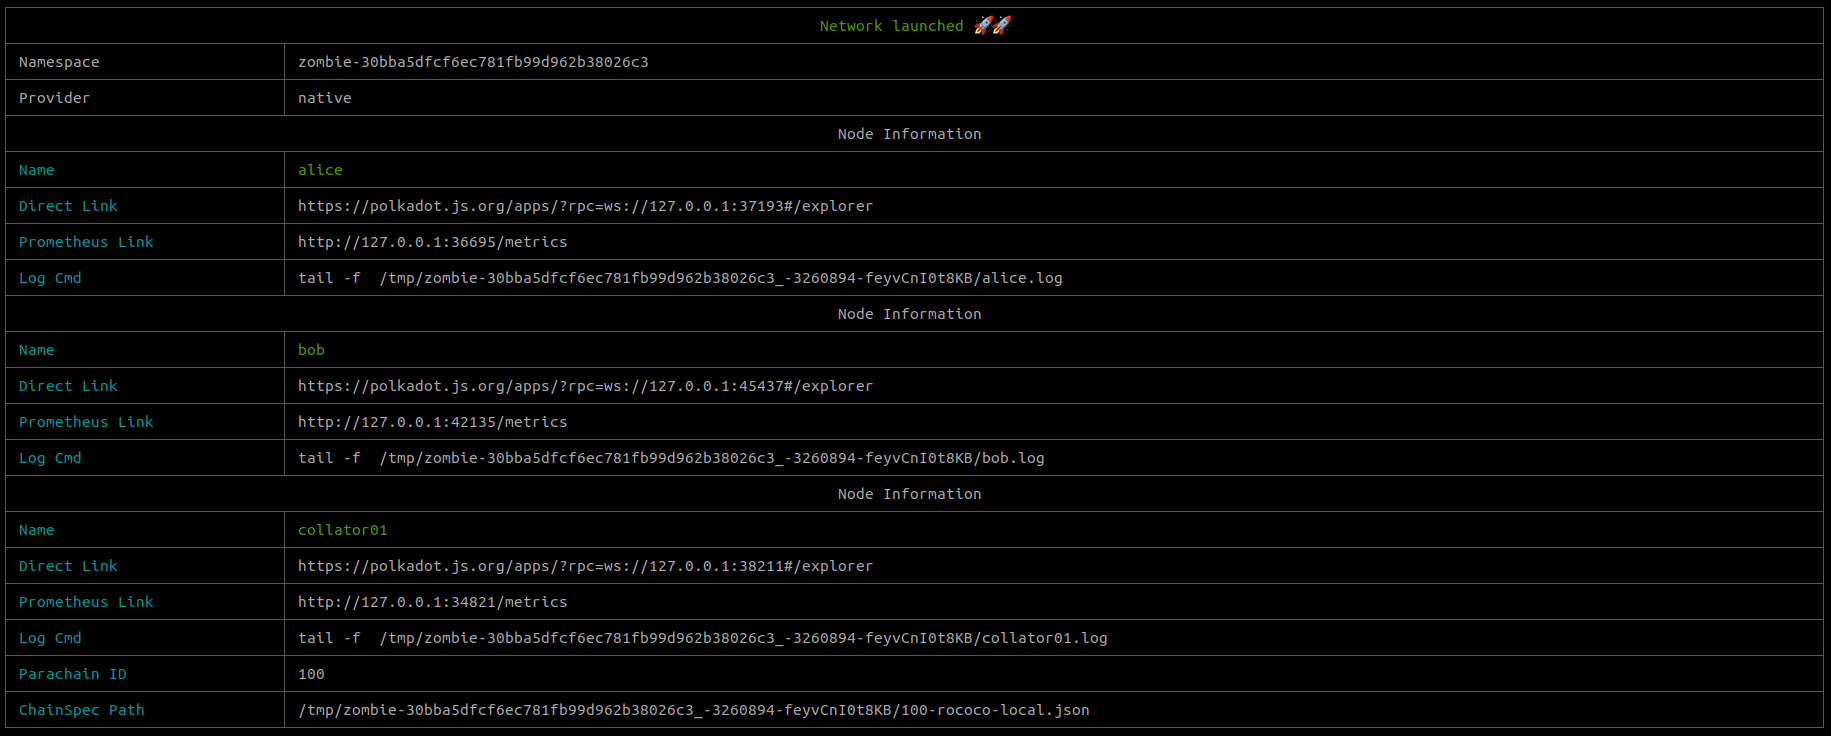
This example shows that we can use custom environmental variables in our config file in order to dynamically alter the configuration of the network.
In addition the validators support the capability of running different versions of the image.
Note: In general all the config fields that start with
default_*can be overridden in thenodesorcollatorsconfig.
Example 3 - Big networks with groups
Sometimes you need to launch and test bigger networks and defining nodes one by one is a very manual and error prone task. For this use cases Zombienet allows to define groups of nodes, for both validators and collators.
Using the small network example as base, we can add groups to spawn a bigger network.
[relaychain]
default_image = "docker.io/paritypr/polkadot:latest"
default_command = "polkadot"
default_args = [ "-lparachain=debug" ]

chain = "rococo-local"

  [[relaychain.node_groups]]
  name = "a"
  args = [ "-lparachain=debug", "--database=paritydb-experimental" ]
  count = 5

  [[relaychain.node_groups]]
  name = "b"
  count = 5

[[parachains]]
id = 100

  [[parachains.collator_groups]]
    count = 2
    [parachains.collator_groups.collator]
    name = "collator"
    command = "polkadot-parachain"
    image = "docker.io/parity/polkadot-parachain:latest"
We use node_groups and collator_groups to define the groups we want to spawn, then Zombienet will spawn the desired count and will name the nodes/collators with the index suffix (e.g a-1).
Again, the groups use the default_* fields if they are not overridden in the group definition.
This time for spawning the network we will use the concurrency (-c) flag to spawn the nodes in batches and speed up the process.
./zombienet-linux -p kubernetes -c 5 spawn examples/0003-big-network.toml
And this time we get also a bigger output...
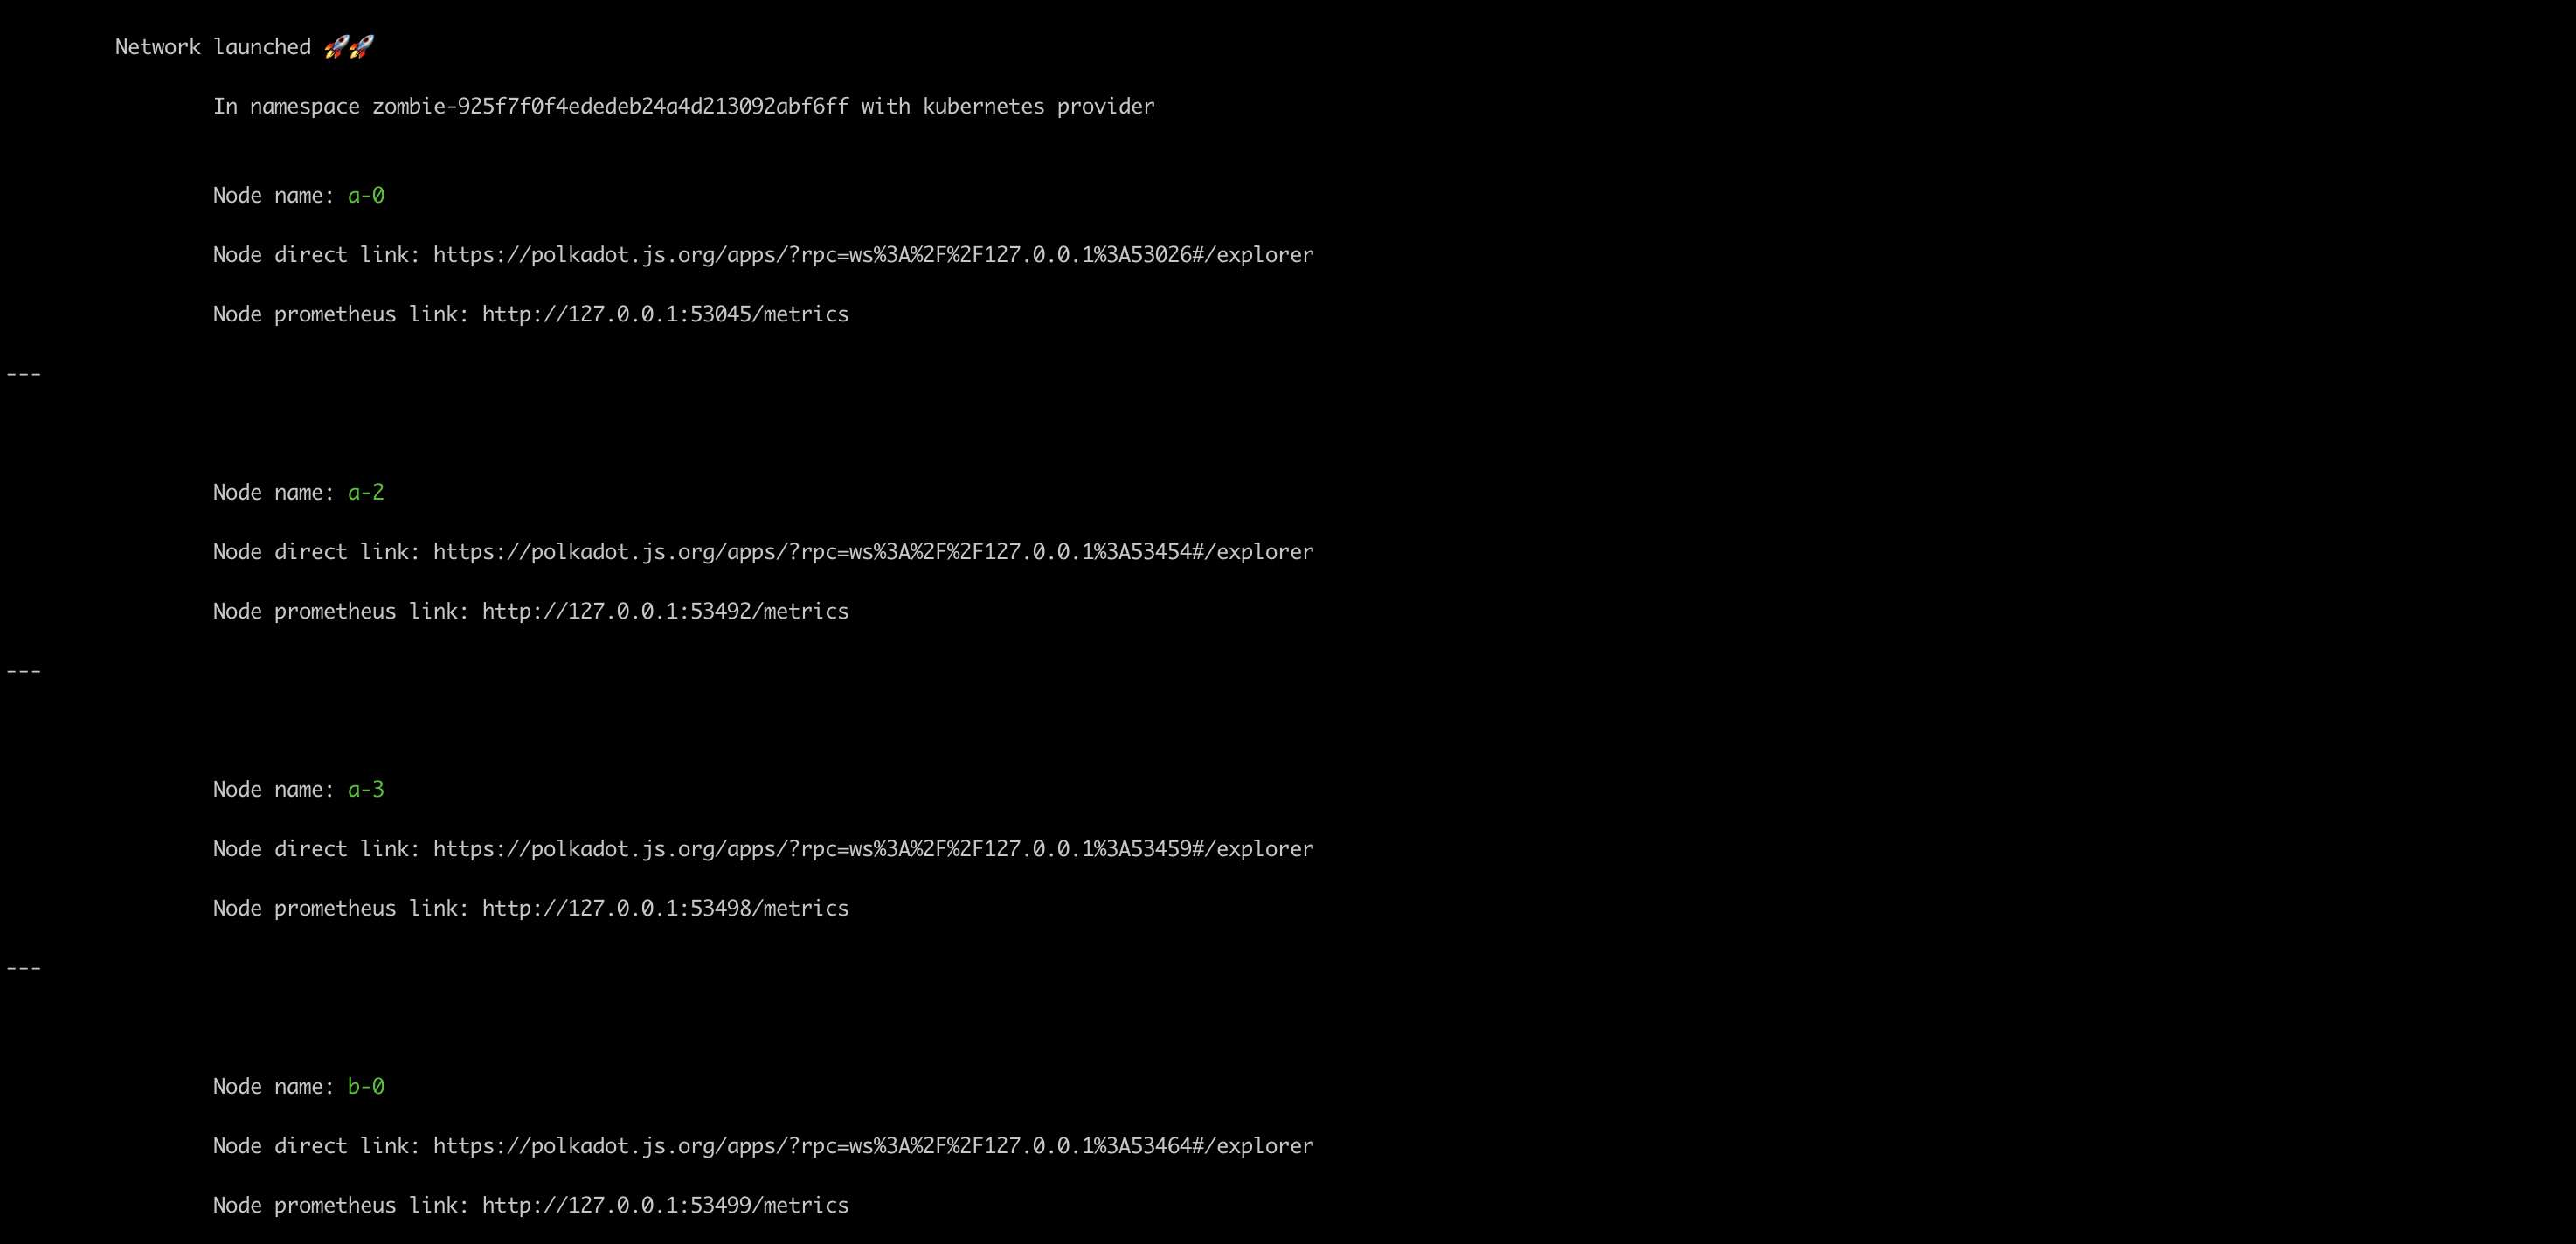
You can use the group name in the testing definition to make the same assertion on all the nodes/collators of the group.
For example:
Description: Big Network test
Network: ./0003-big-network.toml
Creds: config

# metrics
a: reports node_roles is 4
b: reports sub_libp2p_is_major_syncing is 0
And now we can run the test and get the report
./zombienet-linux -p kubernetes -c 5 test examples/0003-big-network.zndsl

Logs and troubleshooting
Node logs
Logs are always a great resource for troubleshooting. Zombienet gives you an easy way to access a node's logs in all the supported providers.
Logs in Kubernetes
Using the kubernetes provider you have a couple of options to follow the logs.
The first is using the command that zombienet suggests in the output of the running nodes:
	a-0 running

		 You can follow the logs of the node by running this command:

			 kubectl logs -f a-0
If you have a prometheus operator installed in your cluster, Zombienet will create a PodMonitor to collect all the node's logs and make it available in your Grafana dashboard which you can also use.
Logs in Podman
When you use podman you can follow the logs of the pods with the command suggestion that zombienet gives you when it spawns each pod.
    alice running

        You can follow the logs of the node by running this command:

                podman logs -f alice_pod-alice
Logs in native
With the native provider you can follow the logs of the pods with the command suggestion that zombienet gives you when it spawns a new process.
For example:
    alice running

        You can follow the logs of the node by running this command:

                tail -f /var/folders/rz/1cyx7hfj31qgb98d8_cg7jwh0000gn/T/zombie-22eaa5159aca78ff41e0249c3931b472_-91504-Ea3rT0YgKH2Y/alice.log
Troubleshooting
Zombienet provides an easy way to follow the spawning process by enabling the debug logs using the DEBUG environment variable to manage the output.
DEBUG=zombie* ./zombienet-linux -p kubernetes -c 5 test examples/0003-big-network.zndsl
Podman infra
Zombienet will automatically spawn some infrastructure pods to give the users a monitoring stack when the podman provider is used.

The grafana pod is running under the default user configuration and has prometheus and tempo already configured as datasources.
Network definition spec
NOTE: Final config spec is TBD, check examples for use cases.
The network config can be provided both in json or toml format and each section can contain provider specific keys that are ignored by others, e.g. when you use the native provider all references to image/s for nodes are ignored.
settings
bootnode: (Boolean, default true) add bootnode to network.timeout: (number) global timeout to use for spawning the whole network.provider: (String, defaultkubernetes) Provider to use (e.g kubernetes, podman).backchannel: (Boolean, default false) Deploy an instance of backchannel server. Only available onkubernetes.polkadot_introspector: (Boolean, default false) Deploy an instance of polkadot-introspector, only available onpodmanandkubernetes.jaeger_agent: (String) The jaeger agent endpoint passed to the nodes, only available onkubernetes.enable_tracing: (Boolean, default true) Enable the tracing system, only available onkubernetes.tracing_collator_url: (String) The url of the tracing collator used to query by the tracing assertion (Should be tempo query compatible).tracing_collator_service_name: (String, defaulttempo-tempo-distributed-query-frontend) service name for tempo query frontend, only available onkubernetes.tracing_collator_service_namespace: (String, defaulttempo) namespace where tempo is running, only available onkubernetes.tracing_collator_service_port: (Number, default3100) port of the query instance of tempo, only available onkubernetes.node_spawn_timeout: (Number, default per provider) timeout to spawn pod/process.local_ip: (String, default "127.0.0.1") ip used for expose local services (rpc/metrics/monitors).node_verifier: (String, "None" or "Metric"), Allow to manage how we verify node readiness or disable (None). The default value isMetric.isolate_env: (boolean, default false), If true, zombienet will add a random suffix toprotocolId(in the chain-spec) and will add theforkIdfield with the same value of theprotocolId(plus the suffix). This will isolate the network since the prefix used in p2p protocols will not match with other networks (mostly used to run multiple networks in native provider).
relaychain
default_command: (String, default polkadot) The default command to run.default_image: (String, default polkadot-debug:master) The default image to use for the nodes of therelaychain.chain: (String, defaultrococo-local) The chain name.chain_spec_path: (String) Path to the chain spec file, NOTE should be theplainversion to allow customizations.chain_spec_command: (String) Command to generate the chain spec, NOTE can't be used in combination withchain_spec_path.default_args: (Array of strings) An array of arguments to use as default to pass to thecommand.default_substrate_cli_args_version: (0|1|2) Allow to set the substrate cli args version (see: https://github.com/paritytech/substrate/pull/13384). By default zombienet will evaluate your binary and set the correct version, but that produces a small overhead that could be skipped if you set directly with this key.default_overrides: (Array of objects) An array of overrides to upload to the nodes, objects with:local_path: string.remote_name: string.
default_resources: (Object) Only available inkubernetes, represent the resourceslimits/reservationsneeded by the nodes by default.default_prometheus_prefix: A parameter for customizing the metric's prefix. If parameter is placed inrelaychainlevel, it will be "passed" to allrelaychainnodes. Defaults to 'substrate'.random_nominators_count: (number, optional), if is set and the stacking pallet is enabled zombienet will generatexnominators and will be injected in the genesis.max_nominations: (number, default 24), the max allowed number of nominations by a nominator. This should match the value set in the runtime (e.g Kusama is 24 and Polkadot 16).nodes:*name: (String) Name of the node. Note: Any whitespace in the name will be replaced with a dash (e.g 'new alice' -> 'new-alice').image: (String) Override default docker image to use for this node.command: (String) Override default command.command_with_args: (String) Override default command and args.args: (Array of strings) Arguments to be passed to thecommand.- Flag Exclusion: You can exclude default flags by prefixing them with
-:. For example,-:--insecure-validator-i-know-what-i-dowill exclude the default--insecure-validator-i-know-what-i-doflag that is normally added to validator nodes. Both full flag names (e.g.,-:--flag-name) and short names (e.g.,-:flag-name) are supported. - Default flags added by Zombienet:
--no-mdns: Always added to all nodes--no-telemetry: Added when telemetry is disabled (default)--prometheus-external: Added when prometheus is enabled--validator: Added to validator nodes--insecure-validator-i-know-what-i-do: Added to validators (substrate CLI v2+)--unsafe-rpc-external: Added in containerized environments--rpc-methods unsafe: Added by default--rpc-cors all: Added by default- Port flags:
--prometheus-port,--rpc-port
- Flag Exclusion: You can exclude default flags by prefixing them with
substrate_cli_args_version: (0|1|2) By default zombienet will evaluate your binary and set the correct version, but that produces a small overhead that could be skipped if you set directly with this key.validator: (Boolean, default true) Pass the--validatorflag to thecommand.invulnerable: (Boolean, default false) If true, the node will be added toinvulnerablesin the chain spec.balance: (number, default 2000000000000) Balance to set inbalancesfor node's account.env: Array of env vars Object to set in the container.- name: (String) name of the
envvar. - value: (String| number) Value of the env var.
- name: (String) name of the
bootnodes: Array of bootnodes to use.overrides: Array ofoverridesdefinitions.add_to_bootnodes: (Boolean, default false) Add this node to the bootnode list.resources: (Object) Only available inkubernetes, represent the resourceslimits/reservationsneeded by the node.ws_port: (number), WS port to use.rpc_port: (number) RPC port to use.prometheus_port: (number) Prometheus port to use.prometheus_prefix: A parameter for customizing the metric's prefix for the specific node. Will apply only to this node; Defaults to 'substrate'.keystore_key_types: Defines which keystore keys should be created, for more details checkout details below.
node_groups:*name: (String) Group name, used for naming the nodes (e.g name-1) Note: Any whitespace in the name will be replaced with a dash (e.g 'new group' -> 'new-group').*count(Number), Number ofnodesto launch for this group.image: (String) Override default docker image to use for this node.command: (String) Override default command.args: (Array of strings) Arguments to be passed to thecommand.env: Array of env vars Object to set in the container.- name: (String) name of the
envvar. - value: (String| number) Value of the env var.
- name: (String) name of the
overrides: Array ofoverridesdefinitions.prometheus_prefix: A parameter for customizing the metric's prefix for the specific node. Will apply to all the nodes of the group; Defaults to 'substrate'.resources: (Object) Only available inkubernetes, represent the resourceslimits/reservationsneeded by the node.substrate_cli_args_version: (0|1|2) By default zombienet will evaluate your binary and set the correct version, but that produces a small overhead that could be skipped if you set directly with this key.
parachains
-
parachainsArray ofparachaindefinition objects-
*id: (Number) The id to assign to this parachain. Must be unique. -
add_to_genesis: (Boolean, default true) flag to add parachain to genesis or register in runtime. -
cumulus_based: (Boolean, default true) flag to usecumuluscommand generation. -
with_custom_props: (Boolean, default false) flag to enable customization of parachain chain-spec properties (name, id, protocolId). When true, the chain-spec will be customized with parachain-specific identifiers. When false, the original chain-spec properties are preserved. -
default_args: (Array of strings) An array of arguments to use as default to pass to thecommandside. NOTE: this args will be passed to the collator side and shouldn't include args to the full node. -
genesis_wasm_path: (String) Path to the wasm file to use. -
genesis_wasm_generator: (String) Command to generate the wasm file. -
genesis_state_path: (String) Path to the state file to use. -
genesis_state_generator: (String) Command to generate the state file. -
prometheus_prefix: A parameter for customizing the metric's prefix for the specific node. Will apply only to all parachain nodes/collators; Defaults to 'substrate'. -
collator:*name: (String) Name of the collator. Note: Any whitespace in the name will be replaced with a dash (e.g 'new alice' -> 'new-alice').image: (String) Image to use.command: (String, defaultpolkadot-parachain) Command to run.args: (Array of strings) An array of arguments to use as default to pass to thecommand.- Flag Exclusion: You can exclude default flags by prefixing them with
-:. For example,-:--prometheus-externalwill exclude the default--prometheus-externalflag. Both full flag names (e.g.,-:--flag-name) and short names (e.g.,-:flag-name) are supported.
- Flag Exclusion: You can exclude default flags by prefixing them with
packages/orchestrator/src/providers/k8s/index.ts: (0|1) By default zombienet will evaluate your binary and set the correct version, but that produces a small overhead that could be skipped if you set directly with this key.command_with_args: (String) Overridescommandandargs.env: Array of env vars Object to set in the container.- name: (String) name of the
envvar. - value: (String| number) Value of the env var.
- name: (String) name of the
keystore_key_types: Defines which keystore keys should be created, for more details checkout details below.
-
collator_groups:*name: (String) Name of the collator. Note: Any whitespace in the name will be replaced with a dash (e.g 'new alice' -> 'new-alice').*count: (Number) Number ofcollatorsto launch for this group.image: (String) Image to use.command: (String, defaultpolkadot-parachain) Command to run.args: (Array of strings) An array of arguments to use as default to pass to thecommand.- Flag Exclusion: You can exclude default flags by prefixing them with
-:. For example,-:--prometheus-externalwill exclude the default--prometheus-externalflag. Both full flag names (e.g.,-:--flag-name) and short names (e.g.,-:flag-name) are supported.
- Flag Exclusion: You can exclude default flags by prefixing them with
command_with_args: (String) Overridescommandandargs.env: Array of env vars Object to set in the container.- name: (String) name of the
envvar. - value: (String| number) Value of the env var.
substrate_cli_args_version: (0|1|2) By default zombienet will evaluate your binary and set the correct version, but that produces a small overhead that could be skipped if you set directly with this key.
- name: (String) name of the
-
onboard_as_parachain: (Boolean, default true) flag to specify whether the para should be onboarded as a parachain or stay a parathread -
register_para: (Boolean, default true) flag to specify whether the para should be registered. Theadd_to_genesisflag must be set to false for this flag to have any effect.
-
hrmp_channels: (Array of objects)
sender: (Number) parachain Id.recipient: (Number) parachain Id.max_capacity: (Number)max_message_size: (Number)
types
- Object to use as
user defined typeswith the js api.
keystore_key_types
-
There are 2 ways to specify key, values that don't respect below format will be ignored:
- short:
audi- createsaudikey type that defaults to predefined schema, it predefined schema for given key type doesn't exist it is ignored - long:
audi_sr- createsaudikey type withsrschema
- short:
-
Schemas:
ed,ec,sr -
Predefined key type schemas:
aura-srif statemint or asset hub polkadot parachain, otherwiseedbabe-srimon-srgran-edaudi-srasgn-srpara-srbeef-ecnmbs-srrand-srrate-edacco-srbcsv-srftsv-ed
Testing DSL
Abstract
One of the goals of Zombienet it to provide a simple way to create tests, for that purpose we create a simple DSL that abstract the way to define tests using a defined set of assertions that allow users to make test based on:
- On chain storage
- Metrics
- Histograms
- Logs
- System events
- Tracing
- Custom api calls (through polkadot.js)
- Commands
Each of this abstractions are expressed by sentences defined in a natural language style, so each test line will be mapped to a test tu run.
Also, the test file (*.zndsl) includes a pre-defined header fields used to define information about the suite (e.g. network configuration and credentials location)
Test Name
Zombienet use the filename as test name removing all leading number chars before the first - occuency. As explample a test filename 0001-dispute-valid-block.zndsl will produce dispute-valid-block as test name and will be show in the report output of the test runner.
Test file structure
The first lines are used to define the header fields:
- Description: ..... (Optional) long description of the test suite.
- Network: .......... Path to the network definition file, supported both
jsonandtomlformats. - Creds: ............ Credentials file name or
pathto use (Only withkubernetesprovider), we look in the current directory or in$HOME/.kube/if a filename is passed.
Then each line define a test assertion or a command.
Available Assertions
-
Well know functions: already mapped test function
node-name: well-know_defined_test [within x seconds]- alice: is up
- alice: parachain 100 is registered within 225 seconds
- alice: parachain 100 block height is at least 10 within 250 seconds
-
Histogram assertion: Get metrics from prometheus, calculate the histogram and assert on the target value/s.
node-name: reports histogrammemtric_namehas comparator target_value samples in buckets ["bucket","bucket",...] [within x seconds]- alice: reports histogram polkadot_pvf_execution_time has at least 2 samples in buckets ["0.1", "0.25", "0.5", "+Inf"] within 100 seconds
-
Metric assertion: Get metric from prometheus and assert on the target value.
node-name: reportsmetric_namecomparator target_value (e.g "is at least x", "is greater than x") [within x seconds]- alice: reports node_roles is 4
-
Logs assertions: Get logs from nodes and assert on the matching pattern (support
regexandglob).node-name: log line (contains|matches) ( regex|glob) "pattern" [within x seconds]- alice: log line matches glob "rted #1" within 10 seconds
-
Logs assertions: Get logs from nodes and assert on the number of lines matching pattern (support
regexandglob).node-name: count of log lines (containing|matcheing) ( regex|glob) "pattern" [within x seconds]- alice: count of log lines matching glob "rted #1" within 10 seconds
-
System events assertion: Find a
system eventfrom subscription by matching apattern. NOTE the subscription is made when we start this particular test, so we can not match on event in the past.node-name: system event (contains|matches)( regex| glob) "pattern" [within x seconds]- alice: system event matches ""paraId":[0-9]+" within 10 seconds
-
Tracing assertion: Match an array of
span namesfrom the supplied traceID. NOTE this is not supported with the native provider.node-name: trace with traceIDcontains ["name", "name2",...] - alice: trace with traceID 94c1501a78a0d83c498cc92deec264d9 contains ["answer-chunk-request", "answer-chunk-request"]
-
Custom js scripts: Allow to run a defined JS script and assert on the completeness or return value.
node-name: js-script script_relative_path [ return is comparator target_value] [within x seconds]- alice: js-script ./0008-custom.js return is greater than 1 within 200 seconds
-
Custom ts scripts: Allow to run a defined TS script and assert on the completeness or return value.
node-name: ts-script script_relative_path [ return is comparator target_value] [within x seconds]- alice: ts-script ./0008-custom-ts.ts return is greater than 1 within 200 seconds
-
Backchannel wait for value and register to use
- node-name: wait for
var nameand use asX[within 30 seconds]- alice: wait for name and use as X within 30 seconds
- node-name: wait for
Commands (Only works with podman and kubernetes providers)
Commands allow to interact with the nodes, given the ability to run some pre-defined commands or an arbitrary command in the node.
- restart
- node-name: restart [after x seconds]
Will stop the
processand start again after thexamount of seconds or innmediatly. - node-name: pause Will pause (SIGSTOP) the process
- node-name: resume Will pause (SIGCONT) the process
- sleep x
Will sleep the test-runner for
xamount of seconds.
- node-name: restart [after x seconds]
Will stop the
Development
Requirements
- Node.js
- kubernetes cluster to use as target
kubectlcommand installed.
- Podman
Installation
You need to first clone this repository and run:
❯ cd zombienet/javascript
❯ npm i && npm run build
Download and install needed artifacts (optional)
For an easier and faster setup of your local environment, run:
❯ cd zombinet/javascript
❯ npm i && npm run zombie -- setup <binaries>
This allows to use the setup script, making everything ready for a ZombieNet dev environment.
You can use the following arguments:
--help shows the different options and commands for using the Zombienet CLI.
--binaries or -b: enables providing the binaries that you want to be downloaded and installed during the setup. Possible options: polkadot, polkadot-parachain.
For example:
❯ cd zombinet/javascript
❯ npm i && npm run zombie -- setup polkadot polkadot-parachain
Note: If you are using macOS please clone the polkadot-sdk repo and run it locally. At the moment there is no
polkadotbinary for MacOs.
The command above will retrieve the binaries provided and try to download and prepare those binaries for usage.
At the end of the download, the setup script will provide a command to run in your local environment in order to add the directory where the binaries were downloaded in your $PATH var, for example:
Please add the dir to your $PATH by running the command: export PATH=/home/<user>/<current_directory>/dist:$PATH
Nix Flake
Each time the javascript/package-lock.json is updated, the value of npmDepsHash must be updated in flake-module.nix.
The value it needs to be updated to can be found by running:
nix run nixpkgs#prefetch-npm-deps -- javascript/package-lock.json 2>/dev/null
Using Zombienet
With the above steps completed, the zombienet CLI is ready to run:
❯ cd zombinet/javascript
❯ npm run zombie

Usage: zombienet [options] [command]

Options:
  -c, --spawn-concurrency <concurrency>    Number of concurrent spawning process to launch, default is 1
  -p, --provider <provider>                Override provider to use (choices: "podman", "kubernetes", "native")
  -l, --logType <logType>                  Type of logging - defaults to 'table' (choices: "table", "text", "silent")
  -d, --dir <path>                         Directory path for placing the network files instead of random temp one
                                           (e.g. -d /home/user/my-zombienet)
  -f, --force                              Force override all prompt commands
  -h, --help                               display help for command

Commands:
  spawn [options] <networkConfig> [creds]  Spawn the network defined in the config
  test <testFile> [runningNetworkSpec]     Run tests on the network defined
  setup [options] <binaries...>            Setup is meant for downloading and making dev environment of ZombieNet ready
  convert <filePath>                       Convert is meant for transforming a (now deprecated) polkadot-launch configuration to zombienet configuration
  version                                  Prints zombienet version
  help [command]                           display help for command
Projects using Zombienet
Below can be found some of the projects that are currently using Zombienet as integration or as a testing framework:
In Parity:
- CAPI
- Cumulus
- Polkadot in the testing pipeline;
- Substrate
In the Polkadot ecosystem:
Acknowledgement
This project takes inspiration and some patterns from polkadot-launch.